We use affiliate links to run our site. When you buy through links on our site, we may earn an affiliate commission, without any added cost to you. Learn more
Imagine this: You water a lovely new plant in its pot. The water drains out of the holes at the bottom, and soon the top looks completely dry. You feel proud, thinking you’ve done everything right.
But below the surface, the roots are actually drowning in a hidden puddle of water. This sneaky problem is called the *perched water table*, and it can catch even the best gardeners off guard.
Honestly speaking, soil health isn’t just about the dirt. It’s about the air pockets you create in it. And perlite is one of the best growing medium to keep those pockets safe from gravity and compaction.
Horticultural perlite is a powerful, and permanent architectural tool. Whether you are an urban gardener or a commercial grower, learning to work with perlite will completely transform how you grow plants.
Let’s look closely at what makes perlite special. We’ll explore the science behind it and custom mixes that can elevate your garden.
What is Perlite?
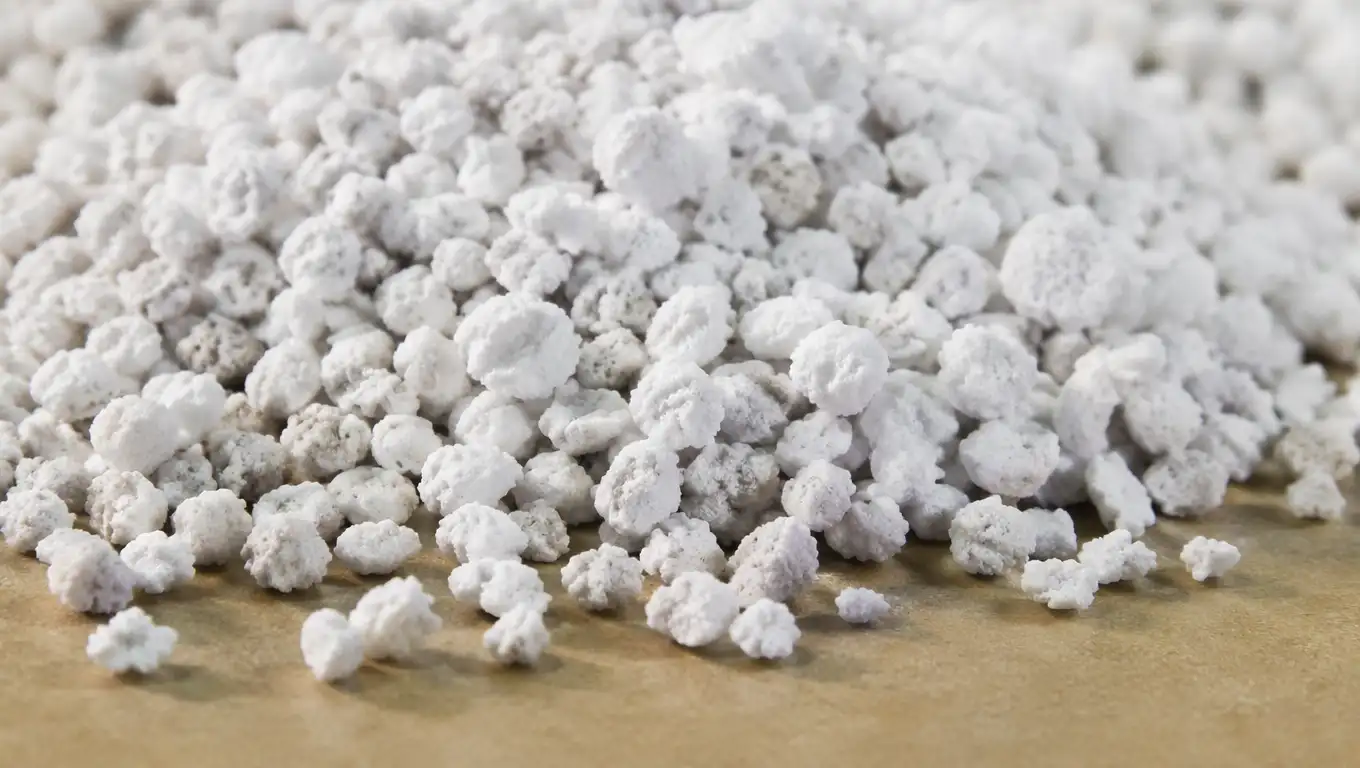
If you’ve ever touched potting soil, you’ve noticed the lightweight white bits. They crunch and leave dust on your fingers. Those bits are perlite, a volcanic rock that forms when lava cools quickly.
When water vapor cools, it gets trapped. This forms a glassy structure that is usually gray or black. In its natural form, perlite is too dense for plant roots to grow through.
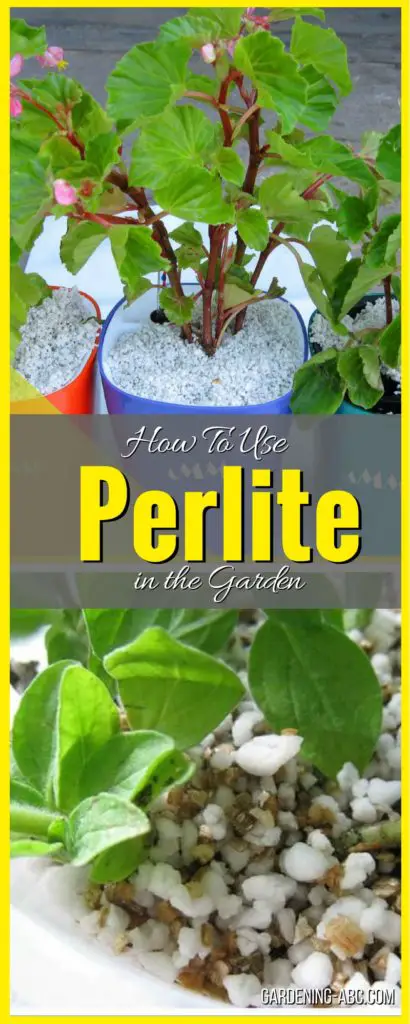
When heated, perlite expands, becoming lightweight and porous. This is great for potting soil. It improves drainage and helps roots breathe. The white specks in potting soil are tiny pieces of expanded perlite. They may look small, but they are crucial for helping plants grow strong and healthy.
How Expanded Perlite is Made:
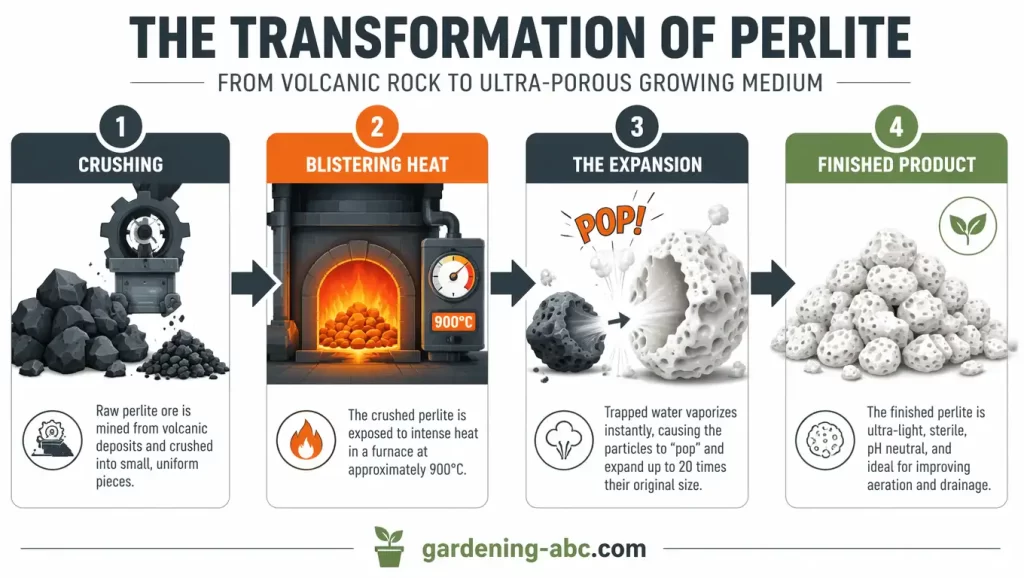
To make this heavy volcanic glass useful for gardening, it undergoes a special process. First, raw perlite ore is crushed. Then, it is placed in furnaces heated to very high temperatures, between 850°C and 900°C (1,580°F to 1,650°F).
When the rock reaches these intense temperatures, it softens. At the same time, the tiny water molecules trapped inside turn into steam. This steam escapes and softens the rock, making it pop like popcorn. The material expands up to 20 times its original size!
This change makes “expanded perlite.” It’s the clean, bright white, super-porous material we all know and love.
The Chemical and Internal Structure of Perlite:
Perlite is mainly made up of silica (SiO2), which accounts for about 70% to 75% of its weight. The rest is mainly aluminum oxide (Al2O3). It also has small amounts of sodium, potassium, iron, magnesium, calcium, and some moisture.
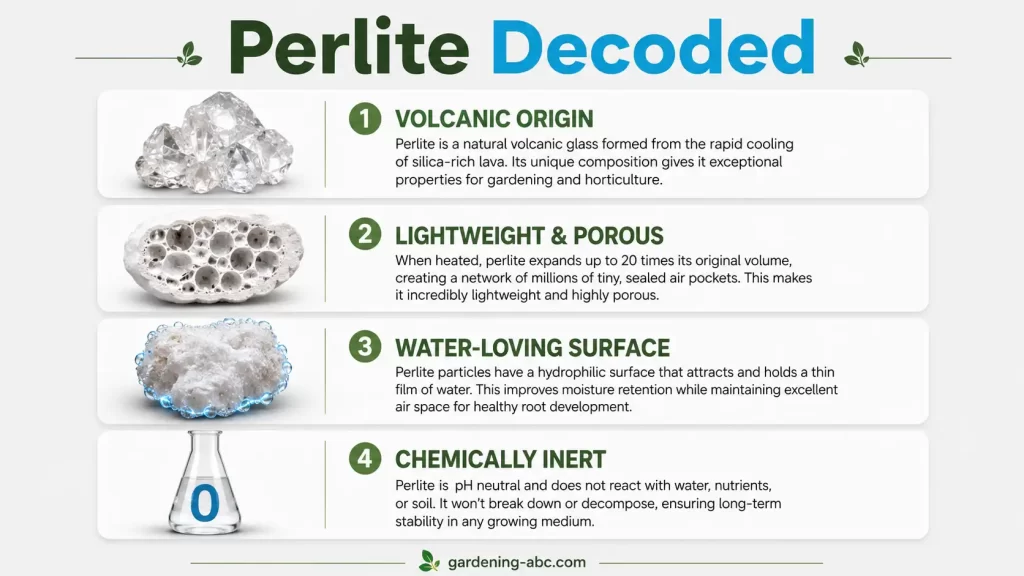
What makes expanded perlite special is its structure. When it expands, it forms a closed-cell internal design, similar to tiny glass bubbles. Because these bubbles are sealed, water can’t get inside a perlite particle. Instead, moisture and nutrients stick to the uneven outer surface, creating a very thin layer of water.
Perlite is chemically neutral, with a low Cation Exchange Capacity (CEC) of 3 to 4 meq/100g. This means it won’t hold onto nutrients, nor will it affect your fertilizers or change your soil’s chemistry. It serves as a support system, helping water and air flow through the soil.
The Battle Against the Perched Water Table (PWT)
To understand why perlite matters, let’s explore what happens in a flower pot when you water it.
When you water a container, gravity pulls the water down toward the drainage holes. At the same time, capillary forces—the way narrow spaces in the soil pull water back up—are working against it.
When these two forces balance out, a layer of saturated mud forms at the bottom of the pot. This is called the Perched Water Table (PWT). In this 2 to 5 cm zone, every pore fills with water. Oxygen levels drop to zero. Your plant’s roots can’t breathe, which can suffocate them.
The “Gravel Layer” Myth
We’ve all heard the old gardening tip: “Add gravel, broken pottery, or clay balls at the bottom of your pot for better drainage.” Let’s bust this myth once and for all: do not do this.
Water movement follows specific physics. It won’t easily move from fine materials, like potting soil, to coarse ones, like gravel. This only happens when the soil above is completely soaked. Adding gravel doesn’t eliminate the perched water table; it just raises it. This pushes stagnant, anaerobic water closer to your plant’s main root ball.
How Coarse Perlite Restructures Soil
Instead of making an artificial layer at the bottom, change the pore-size distribution throughout the entire soil column. This is where perlite acts as an “anti-gravity shield.”
By mixing coarse perlite into your soil, you create thousands of large macro-pores. Gravity drains water easily from these gaps, leaving them filled with fresh air. Only the tiny micro-pores in your compost or peat moss hold capillary water.
Recent lab tests show that adding perlite boosts water retention by 25% to 30% through surface films. It also cuts total drainage time by up to 45%.
This ensures your soil keeps a healthy 15% to 20% air volume, even when saturated. Trials indicate this can reduce fungal root diseases by 28%.
Types of Perlite: Coarse Vs Fine
Not all bags of perlite are the same. Sifting and grading separate expanded perlite into sizes suited for different plant needs. Using the wrong grade can hurt performance. It’s crucial to match the size to your project.
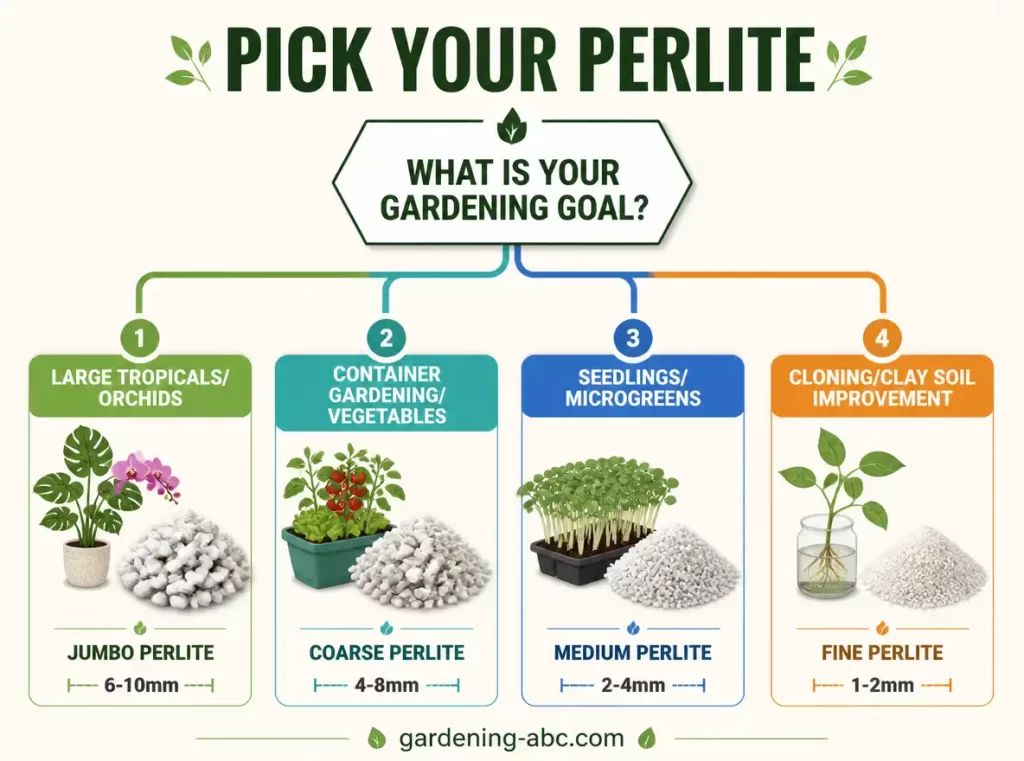
The standard grading scale includes four main options:
- Super Coarse / Jumbo (6–10+ mm): With a loose bulk density of 60–80 kg/m³, this grade offers excellent macro-porosity. It’s ideal for thick-rooted tropical aroids, large outdoor raised beds, or orchid collections needing big air pockets.
- Coarse (4–8 mm): At 80–100 kg/m³, this is the go-to choice for container gardening, backyard tomatoes, cannabis, and setups with frequent watering.
- Medium (2–4 mm): This grade has a bulk density of 100–120 kg/m³. It balances air and moisture well. This makes it great for shallow seed-starting trays, microgreens, or small containers under 15 cm deep.
- Fine (1–2 mm): The smallest grade (120–130 kg/m³) retains moisture while providing little aeration. It works best for cloning media or mixed into dense clay garden beds at 20% volume to loosen heavy clumps.
Custom, Substrate Recipes
Ready to step away from generic, store-bought dirt bags and mix your own high-performance growth engines? Here are four specialized, volume-measured substrate recipes tailored for specific plant needs.
Note: Always pre-moisten your ingredients before mixing to keep dust at bay and protect the physical structure of the perlite.
Recipe 1: The Aroid Oxygen Maximizer
Target Plants: Monstera deliciosa, Philodendron gloriosum, Anthurium clarinervium
Tropical epiphyte roots don’t grow in dense mud in the wild; they climb up trees and breathe open air. This mix creates a loose, chunky scaffold that prevents root rot entirely .
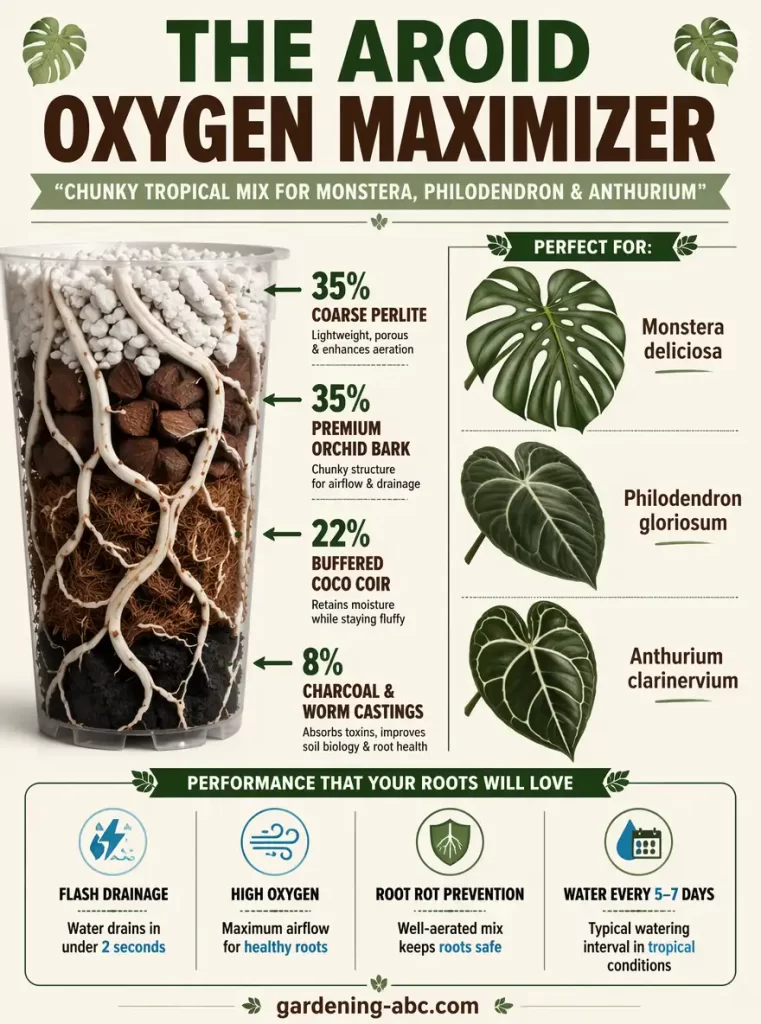
30%–40% Coarse Perlite: Ensures permanent macro-porosity and rapid gravity drainage .
30%–35% Premium Orchid Bark: Provides a slow-decomposing structural backbone for roots to grip .
20%–25% Buffered Coco Coir: Supplies moderate, even water retention and cation buffering .
5%–10% Charcoal & Worm Castings: Introduces natural microbial inoculants and trace organic nutrition .
Expected Performance: Water will flash-drain through this mix in less than 2 seconds, dropping the perched water table height to a mere 1.5 cm or less. Plan to re-water every 5 to 7 days.
Buy Premium coarse horticultural perlite
Recipe 2: The High-Frequency Fertigation Blend (Coco-Perlite)
Target Plants: Potted container tomatoes, heavy-fruiting annuals, and automated drip irrigation networks .
Pushing plants to grow fast with automated watering can lead to compacted, muddy soil. This blend stays highly oxygenated even under constant saturation .
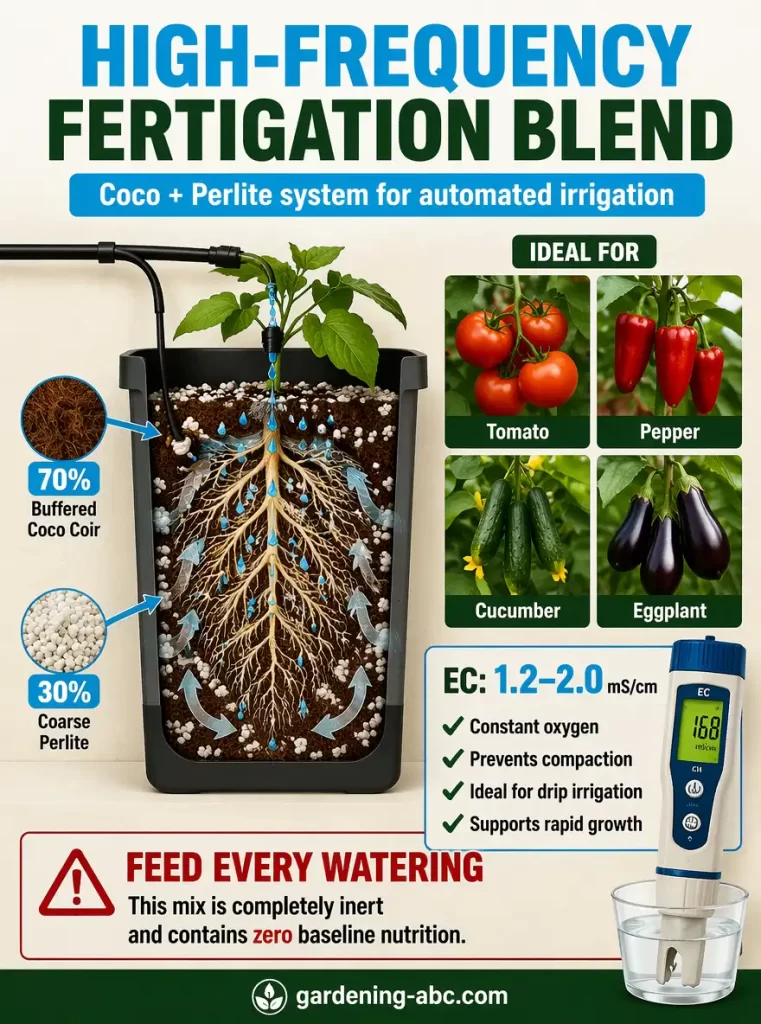
30% Coarse Perlite: Prevents the fine coir fibers from settling and compacting over time .
70% Buffered Coco Coir: Acts as an exceptionally oxygen-permeable, moisture-holding matrix .
Crucial Management Note: Since both ingredients are inert, this mix offers no baseline nutrition. You must feed your plants a complete liquid nutrient solution (EC 1.2–2.0 mS/cm) with every single watering.
Recipe 3: The Arid/Succulent Matrix
Target Plants: Desert Cacti, Euphorbia, Lithops, and Agave.
Desert plants will drop their roots and rot within 48 hours if forced to sit in a damp environment. This recipe guarantees a near-instant drainage velocity to mimic dry, rocky desert horizons .
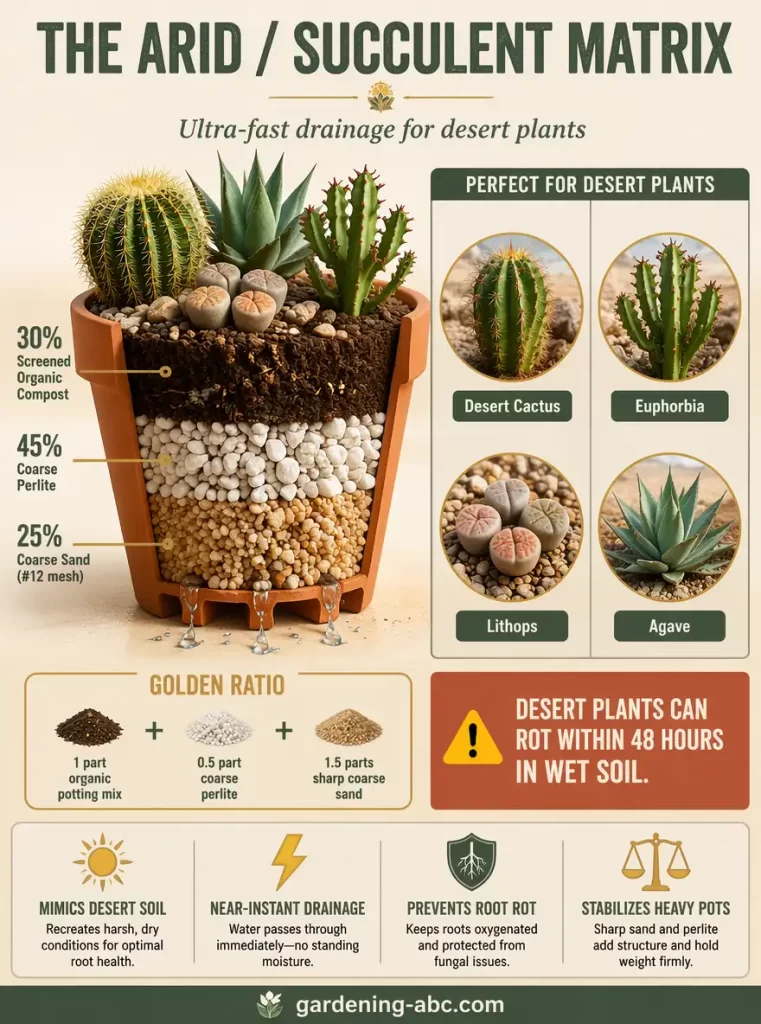
40%–50% Coarse Perlite: Maximizes aeration and forces the perched water table to zero .
20%–30% Coarse Sand (#12 mesh): Adds essential mineral grit, physical weight, and structural stability so top-heavy pots don’t tip over .
20%–30% Screened Organic Compost/Loam: Adds a bit of organic matter to retain moisture without becoming soggy.
Golden Ratio: For a quick blend, simply combine 1 part standard organic potting mix, 0.5 part coarse perlite, and 1.5 parts sharp coarse sand.
Recipe 4: The Ultimate Seed-Starting Mix
Target Plants: All vegetable seeds, annual flowers, and delicate soft-wood cuttings .
Sprouting seeds need completely sterile conditions. This prevents “damping-off” fungal diseases. They also need consistent moisture. This keeps the delicate radicle from drying out.
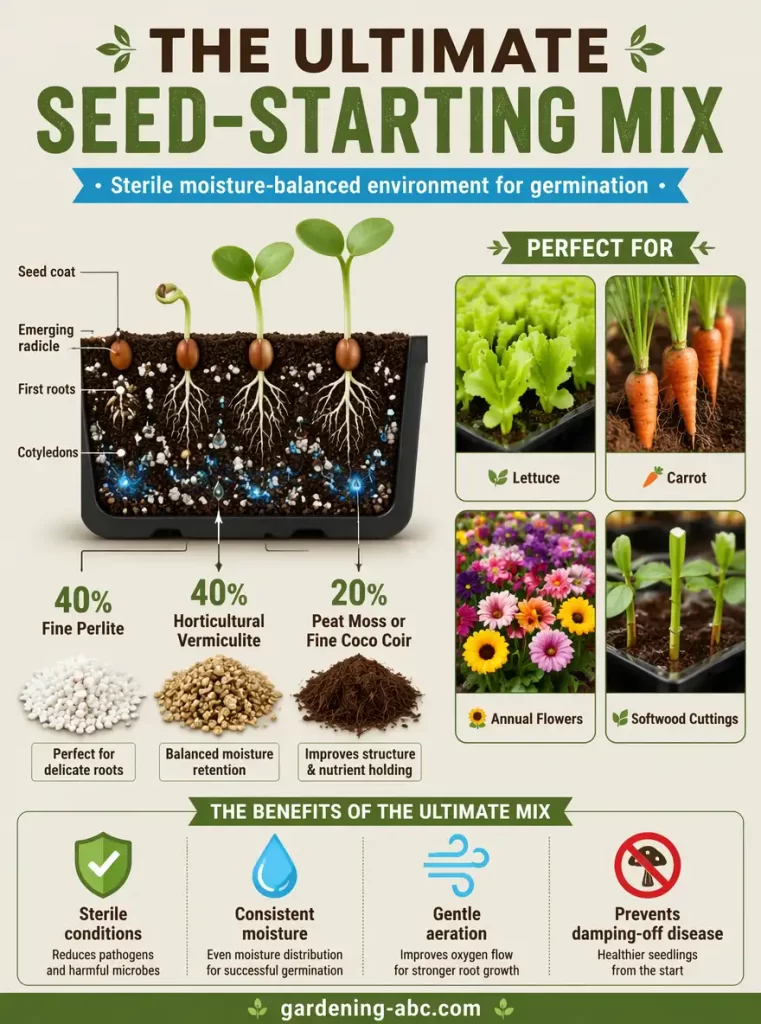
* 30%–50% Fine or Medium Perlite: Delivers delicate aeration while ensuring water drains safely away from the stem .
* 30%–50% Horticultural Vermiculite: Acts as a spongy partner that holds consistent, even moisture right around the seed coat .
* 20%–40% Peat Moss or Fine Coco Coir: Provides a lightweight, clean, organic base material.
Perlite vs. Pumice vs. Vermiculite
Gardeners often swap these three mineral amendments, but they are quite different. Choosing the wrong one can really change your soil’s water profile. Let’s break it down:
- Horticultural Perlite: It’s the best value for aeration, costing $10-$25 per 100L. It lasts about 18 to 24 months before breaking down. It holds little water and doesn’t keep many nutrients. It’s also super light, so it can float to the top of your pots during heavy watering.
- Crushed Pumice: Pumice is like perlite’s stronger, longer-lasting sibling. It holds about twice as much water as perlite, lasts over 5 years, and retains way more nutrients. It’s also much heavier, so it won’t float. However, it’s pricier ($30-$60+ per 100L) and harder to find.
- Vermiculite: This mineral is the opposite of perlite when it comes to water. It holds a ton of water and has a high nutrient capacity. But, it compresses and collapses after 12-18 months, so it’s not great for long-term aeration.
So, what’s the verdict? Use perlite for cheap, high-aeration plants that you’ll replace every season. Use pumice for long-term plantings, bonsai trees, or heavy outdoor pots. Use vermiculite only for seed starters, ferns, or water-loving tropicals. It’s not good for succulents or cacti.
Troubleshooting
Even with a mineral as simple as perlite, things can go wrong if you don’t respect its physical limits. Here is how to diagnose and correct the three most common perlite failures in the garden :
Pitfall 1: The Infamous “White Cap” (Buoyancy Separation)
The Symptom: After 3 to 6 months of top-watering with a hose or can, your soil forms a hard, white crust of perlite. Meanwhile, the bottom of the pot becomes dark, heavy, and muddy.
The Physics: Expanded perlite is very lightweight, so its density is much lower than water’s. When high-pressure water is applied, it fluidizes the top layer of soil. The lightweight perlite floats to the surface like tiny life jackets. Meanwhile, the heavier, finer organic soil particles sink below.
The Fix: Gently break up the crust and water. Next, add a 1 cm layer of heavy organic mulch, pine bark, or coarse decorative gravel on top of the soil. This keeps the perlite particles locked in place and prevents them from moving up.
Buy Fine pine bark mulch top-dressing
Pitfall 2: Silt Grinding (Mechanical Collapse)
The Symptom: Your potting mix looks dull, gray, and muddy. Instead of draining instantly, water pools on the surface for 15 seconds or longer .
The Physics: Expanded glass bubbles are physically fragile. If you mix your soil components using dry, heavy metal shovels or mechanical tillers, you will literally grind the dry perlite into a fine, glassy silt. This fine powder migrates downward and clogs up the very macro-pores you were trying to create .
The Fix: Always damp-mix your substrates. Spray your perlite with water until it’s fully damp. This moistens the particle surfaces. It greatly lowers friction between particles. This helps prevent fragile bubbles from cracking during mixing.
Pitfall 3: The Starvation Trap (Assuming It Has Nutrients)
- The Symptom: Plants in a high-perlite mix turn pale yellow, stall, and show stunted growth, even with enough water.
- The Physics: This occurs when a grower thinks perlite, being a “natural mineral,” offers plant nutrition. It doesn’t. Using too much perlite in place of nutrient-rich compost weakens the soil’s fertility.
- The Fix: Remember, perlite is a structural tool, not a fertilizer. Always add strong organic amendments like worm castings or compost. You may also need to increase your liquid feeding schedule to keep plants healthy.
Safety First: Is Perlite Toxic?
Let’s clear the air on health concerns: perlite is entirely non-toxic. It has no hazardous chemicals, won’t contaminate your organic veggies, and is totally sterile. However, that fine white dust it creates is a mechanical irritant.
Dumping dry perlite from the bag creates dust clouds. This can irritate your eyes and cause breathing issues. Always wear a simple dust mask. You can also slice the bag open and pour water into it to dampen the material before handling.
If dust does happen to get into your eyes, simply flush them out with clean water for 15 minutes.
What about your plants? For decades, horticultural experts warned that perlite can leach high fluoride levels. This may cause leaf-tip burn in sensitive houseplants, such as Spider Plants (Chlorophytum) and Lilies (Lilium).
A comprehensive study has debunked this myth. Researchers tested five major sources of horticultural perlite through five water leachings. They found that fluoride levels in the first watering were very low (0.05 to 0.8 mg/l) and nearly zero by the fifth watering.
When they grew sensitive crops in mixes with up to 50% perlite at various pH levels, no fluoride toxicity occurred. You can use perlite with total confidence!
Conclusion:
To take your gardening to the next level, don’t think of soil as just dirt that holds a plant up. Manage it like a precise system that helps roots breathe. Consider perlite as the soil’s breathing room, not just something to fill space. It keeps the soil’s air pockets open, which can increase root growth by about 40%. This leads to more roots branching out and a big boost in top growth.
Before you build your next custom potting mix, commit this 4-point structural checklist to memory:
- Choose Your Grade Carefully: For 90% of your standard container veggies and herbs, Coarse (#2) perlite is the best option.
- Pre-Moisten Everything: Never mix dry perlite. First, mist it down with water. This will help remove airborne dust and stop structural crushing.
- Mix by Volume, Not Weight: Since perlite is much lighter than wet peat or compost, always use a scoop or bucket to measure your ratios by volume. Target 20% to 30% for general gardening, and up to 50% for desert species.
- Run a Speed Test: Before you insert your plant, pour water onto the bare mix.The surface water should vanish into the substrate in 3 to 8 seconds. If it takes over 10 seconds, your mix is too fine. Empty the pot and add more coarse perlite to keep those soil lungs breathing!
Frequently Asked Questions (FAQs)
Can I reuse perlite from my old potting soil, or does it break down over time?
Perlite is inorganic and completely sterile. It won’t rot, decompose, or decay like organic peat bark or coco coir. However, it is fragile. Over 18 to 24 months in a container, root pressure, manual tilling, and freeze-thaw cycles can crush large particles into fine silt.
If you grow short-term annuals, you can wash and reuse the coarse pieces. For long-term perennial pots, it’s better to replace it or use a tougher aggregate like pumice.
Will adding perlite to my soil alter my soil’s pH levels over time?
No, it won’t. Perlite is completely chemically inert and sits at an almost perfectly neutral pH range of 6.5 to 7.5. Because it lacks a significant Cation Exchange Capacity (CEC), it acts as a neutral structural bystander. It will not react with your water, alter your liquid fertilizer regimens, or cause sudden swings in soil acidity or alkalinity.
Can I grow plants or root cuttings purely in 100% perlite without any soil?
Sure! Pure, moistened perlite is a great sterile medium for rooting cuttings and starting seeds. Its high aeration promotes quick root branching as plants look for water. It is also commonly used as a standalone substrate in hydroponic systems.
Keep in mind that perlite has no organic nutrients. If you don’t provide a complete liquid fertilizer once roots grow, your plants may stall and starve.
Why does my perlite turn a weird yellow or green color on the surface of my pots?
Don’t panic, this is a very common issue. Perlite holds a thin film of water on its uneven surface. When you top-water, it draws dissolved fertilizer salts and minerals upward. As that water evaporates under lights or sunlight, it leaves yellow or brown crusts.
Also, the moist surface attracts harmless green micro-algae that grow on the white particles. This won’t harm your plants, but you can prevent it by adding a thin layer of organic mulch.
Is perlite safe to use in organic vegetable gardens and earthworm bins?
Yes, it is 100% safe and highly recommended. Expanded perlite is a mined mineral with no synthetic chemicals, microplastics, or toxic additives. It is safe for earthworms and helpful soil microbes. It helps them move through the soil by preventing compaction into a dense, anaerobic brick.
Related source for more information:
Amazon and the Amazon logo are trademarks of Amazon.com, Inc, or its affiliates.
Your posts is quite useful.
Very nice write-up. I certainly appreciate this site.
Keep writing!
complete overall information about perlite. Very concise but relevent