We use affiliate links to run our site. When you buy through links on our site, we may earn an affiliate commission, without any added cost to you. Learn more
Have you ever felt like you are doing absolutely everything right in your garden, yet your plants still look tired, pale, or stubbornly stagnant? You invest in premium seeds, buy sleek containers, and water them on a flawless schedule, but the results just do not match your passion.
If you haven’t integrated coco coir into your setup yet, you are surely missing out on one of the most exciting, transformative materials to hit the gardening world in decades.
Everyone from urban garden hobbyists to massive commercial growers, is making the switch because it simply works better than the old alternatives. It is a quiet horticultural revolution, moving from a discarded tropical husk to an absolute garden superstar.
But here is the catch: success with coco coir does not come from treating it like regular backyard dirt. It is an active, chemically dynamic substrate with its own surface charge, a unique ionic history, and an advanced hydrology that demands a systematic approach.
In this detailed guide, we will unpack the complete technical blueprint to help you master coco coir. We will explore why raw coir can secretly sabotage your crops by locking out vital nutrients, how to permanently disable that mechanism using laboratory-grade buffering, and how to engineer custom textural blends that unleash explosive root growth across an entire crop cycle.
What is Coco Coir?
So, what exactly is this mystical medium? Coco coir (pronounced “KOY-er”) is an entirely natural, organic fiber extracted from the outer husk of the coconut, the fruit of the resilient Cocos nucifera palm.
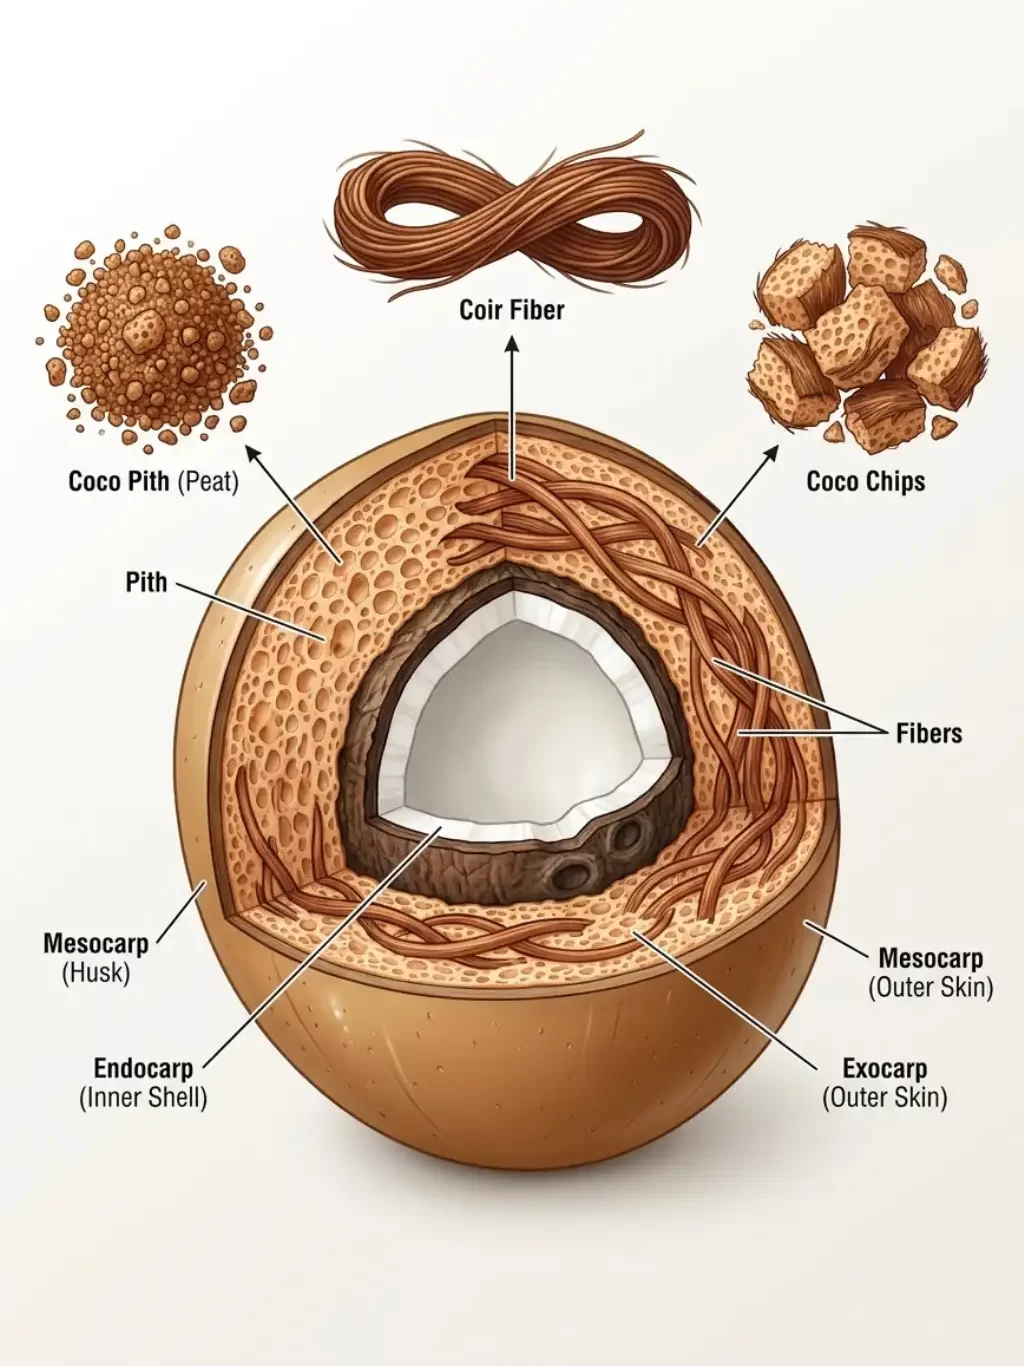
A coconut has three distinct layers: the smooth, waterproof outer green coat; the hard, woody inner shell that protects the delicious white meat and coconut water; and a thick, fluffy, highly fibrous layer sandwiched directly between them. This middle layer is the coconut husk, and it is the birthplace of coir.
For centuries, this thick husk was treated as a frustrating waste product by the global coconut industry—either left in massive piles to slowly rot, tossed into rivers, or occasionally downcycled to manufacture rough doormats, heavy ropes, and industrial brooms.
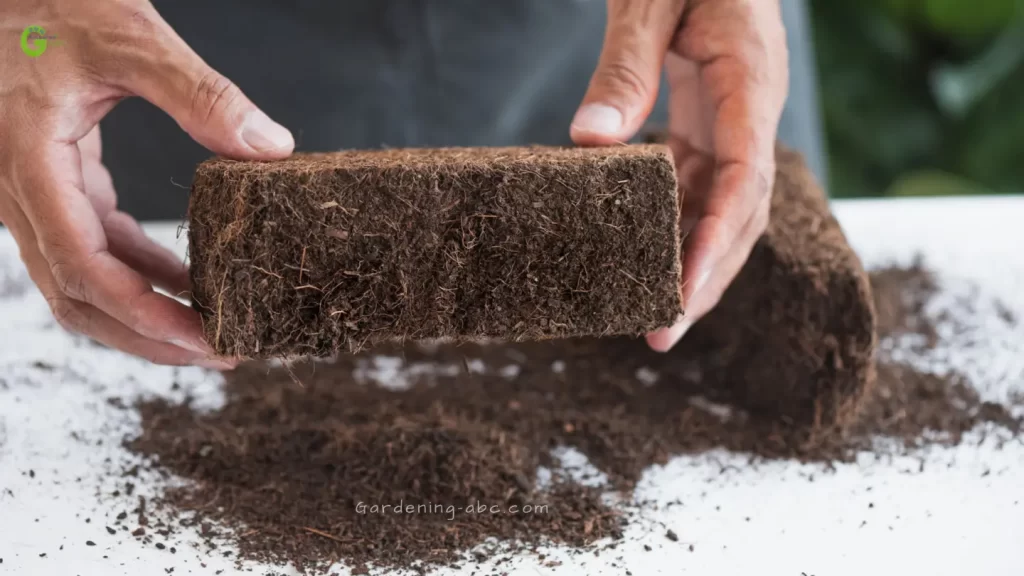
Eventually, horticulturists and soil scientists caught on to a fascinating biological truth: the very same characteristics that protect a coconut when it drops from a tall palm and floats across saltwater oceans make it absolute gardening gold. It is a lightweight, sterile, rot-resistant structural matrix that holds water like a sponge while providing exceptional breathing room for delicate plant roots.
Today, coco coir is used in everything from small container gardens on apartment balconies to massive commercial hydroponic operations. And the reasons why are pretty compelling, as we’re about to explore.
From Industrial Waste to Horticultural Gold
The historical trajectory of the coir industry is very interesting. Before the early 1990s, coir was an environmental and logistical headache in major coconut-processing nations like Sri Lanka, India, and the Philippines. Mountains of unmanaged husks accumulated outside factories, taking decades to break down naturally.
The true breakthrough arrived in the early 1990s when forward-thinking Dutch commercial greenhouse growers began experimenting with processed coir as an alternative to traditional, resource-intensive growing mediums.
They discovered that when these raw fibers were properly washed, dried, graded, and compressed into compact bricks, they transformed into a lightweight, highly transportable, and high-performing cultivation substrate.
This spark ignited a global supply chain revolution. Today, millions of pounds of coco coir are processed and exported annually across the globe.
By upcycling what was once a throwaway agricultural industrial waste product into a prized, high-value growing medium, the horticulture industry quietly birthed a highly sustainable, eco-friendly revolution that benefits both plants and the planet simultaneously.
Coco Coir vs. Sphagnum Peat Moss
For nearly half a century, traditional sphagnum peat moss stood unchallenged as the universal king of container gardening and commercial potting soils. It is undeniable that peat moss is effective at absorbing water and opening up heavy clay soils.
However, as modern growers become increasingly eco-conscious, the severe environmental toll of peat extraction has come into sharp focus.
Sphagnum peat bogs take thousands of years to form, growing at a microscopic rate of just one millimeter per year. These ancient wetlands serve as Earth’s most critical terrestrial carbon sinks, locking away massive amounts of greenhouse gases and supporting fragile, irreplaceable ecosystems.
Harvesting peat moss requires draining these vital wetlands and scraping away layers of living matter, which instantly destroys these habitats and releases thousands of years of sequestered carbon back into our warming atmosphere.
In response to these destructive practices, global regulatory pressures are mounting, and traditional peat mining is facing strict legal cutbacks.
Enter coco coir: the environmentally responsible, circular economy sibling in the soil amendment family. Because coconuts are harvested continuously from living trees without harming the palm itself, coir is a completely renewable, rapid agricultural byproduct.
It is 100% biodegradable, breaks down naturally over several years without leaving any toxic residues, and adds rich, stable organic matter back into the earth, checking every single box for sustainable gardening.
Holds Water Without Suffocating the Roots
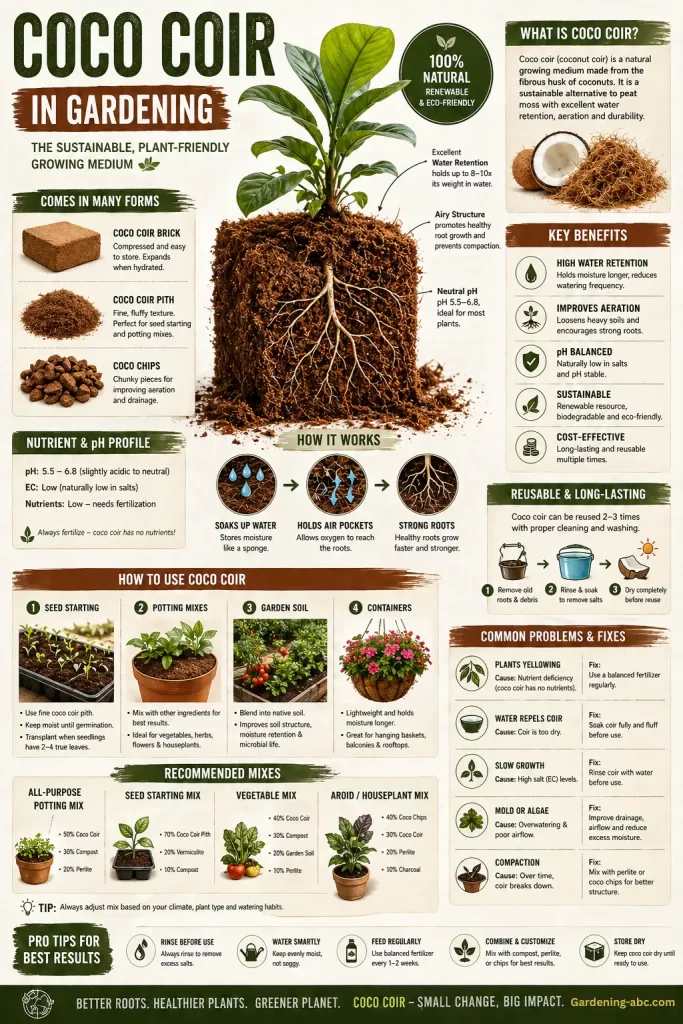
The single most attacktive feature of coco coir is its legendary, near-magical relationship with water. Coir can effortlessly hold up to 8 to 10 times its dry weight in water. When hydrated, it functions like a vast network of microscopic, high-absorbency sponges sitting right at the root zone.
If you have ever accidentally killed a prized houseplant by overwatering, you know that heavy soils or dense potting mixes can hold water too tightly. They become waterlogged, filling every available pore space with liquid, which completely chokes out oxygen and causes roots to drown, rot, and die.
This is where coco coir pulls off its brilliant magic. Unlike dense soils, coir’s unique capillary structure releases moisture gradually, evenly, and predictably, maintaining a luxurious 20% to 30% air-filled porosity even when it is fully saturated to capacity.
It ensures that air and vital oxygen can flow completely unrestricted around the root zone at all times. Think it like this: if standard potting soil is a cramped, stuffy apartment where your roots struggle to breathe, coco coir is a modern, sunlit penthouse with floor-to-ceiling ventilation and an open rooftop garden.
It acts as an exceptional structural buffer, smoothing out the stressful, volatile wet-dry cycles that stunt plant development.
Breathing Room: How Coco Coir Keeps Roots Happy
Roots need more than just water and nutrients — they also need oxygen. This is where a lot of dense, compacted soils fall short. Coco coir has a naturally airy, fibrous structure that maintains good pore space even when wet. This means air can flow freely around your root zone, promoting healthy, vigorous root development.
Think of it this way: if soil is the apartment your roots live in, coco coir is the apartment with great ventilation and a rooftop garden. Roots thrive in it because they get everything they need — moisture, nutrients, and air — all in one package.
Types of Coco Coir: Which One Is Right for You?
A common pitfall for beginner gardeners is assuming that all coco coir is exactly the same. In reality, raw coconut husks are processed into three distinct textural components, each possessing radically different physical traits, water-holding dynamics, and aeration capacities.
Relying blindly on a single unblended texture can inadvertently sabotage your root environment. By understanding the analytical differences between coco peat, coco fiber, and coco chips, you gain the ability to engineer a custom growing matrix tailored precisely to your specific crops, regional climate, and watering habits.
Coco Peat (Coir Pith): The Fine Stuff
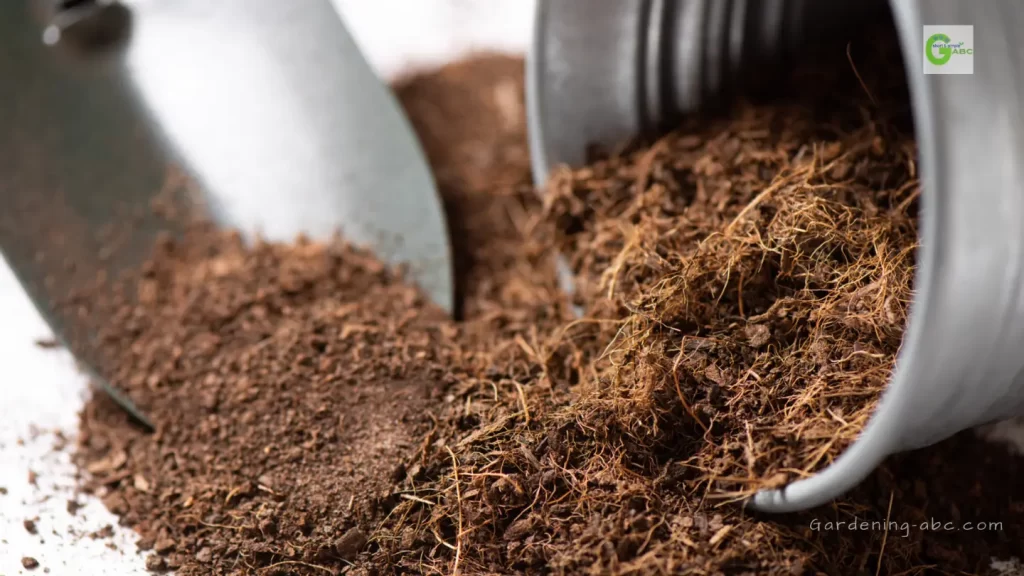
Coco peat, often commercially labeled as coir pith or dust, is the ultra-fine, spongy, particulate matter that results from milling and separating the husk. With an extremely small particle size under 0.5 mm, it looks visually almost identical to rich, dark brown peat moss.
It possesses an astronomical water-holding capacity of 70% to 80%, making it a spectacular base for seed starting, delicate clone propagation, and moisture-retentive potting soils.
The major warning flag with pure coco peat is its high compaction risk over time; because the particles are so fine, they can gradually pack down tightly, restricting long-term aeration if left unblended.
Coco Fiber: The Airy Backbone
Coco fiber consists of the long, coarse, structural wiry strands extracted from the tougher sections of the coconut husk. These durable fibers do not hold much water on their own (possessing a low water-holding capacity of 30% to 40%), but they are unmatched at maximizing physical drainage and air-filled porosity (40% to 60%).
In horticultural applications, these strands serve as the essential architectural scaffolding of your medium. When mixed with fine coco peat, they create robust structural channels that prevent the mix from compacting, ensuring water drains rapidly and roots always have access to fresh oxygen.
Coco Chips: Nature’s Little Sponges
Coco chips are irregular, chunky pieces of coconut husk, roughly the size of wood chips or salad croutons. They represent the ultimate “best of both worlds”. They absorb a moderate amount of moisture internally (50% to 60%) while simultaneously creating massive, open macro-pore pockets (50% to 70%) between the chunks.
This makes them incredibly popular for orchids, anthuriums, and other epiphytic plants that demand lightning-fast drainage. They also make a phenomenal organic top-dress mulch layer, protecting pots from intense sun and surface evaporation crusting.
The Chemistry of Coir: Cracking the Calcium-Magnesium Lockout
Now, let’s understand the invisible chemical hurdle that catches thousands of unsuspecting gardeners off guard every season.
Imagine this frustrating scenario: you purchase a clean, lightweight brick of compressed coco coir, hydrate it perfectly, mix in some shiny perlite, and carefully plant your healthy green seedlings. You wait for the magic to happen. Instead, over the next two weeks, you watch in horror as the new leaves emerge pale, twisted, and covered in ugly, rust-colored spots.
The leaf tips curl, growth completely stalls, and your yields plummet before the race even begins. Most frustrated growers throw their hands up and falsely conclude that coco coir simply “doesn’t work” for them.
The truth is highly scientific, completely predictable, and entirely fixable. Coco coir is not an inert, passive physical space like rockwool or glass wool. It is an active, chemically charged substrate with a powerful surface charge and a complex ionic history.
If you treat coir like generic dirt without addressing its underlying electrical properties, it will actively steal vital nutrition right out of your water, starving your plants via a devastating chemical phenomenon known as calcium-magnesium lockout.
Why Raw Coir Steals Your Nutrients
Because Cocos nucifera palms natively grow in coastal, tropical environments, they spend their lives absorbing massive amounts of sodium (Na⁺) and potassium (K⁺) from salty coastal air and brackish groundwater.
As the husks are processed and slowly decompose, the exposed organic molecules develop an incredibly dense concentration of negatively charged electrical exchange sites.
Industry standard data places coco coir’s CEC in a moderate range of 10 to 30 meq per 100g (with some high-grade contexts reaching 50 to 100 meq/100g), placing it squarely between completely inert rockwool (0 meq/100g) and heavy peat moss (100–200+ meq/100g).
On raw, unbuffered coir, these negative exchange sites come heavily pre-loaded and saturated with monovalent sodium and potassium ions. When you pour a standard nutrient solution rich in divalent calcium (Ca²⁺) and magnesium (Mg²⁺) into raw coir, an immediate, aggressive chemical ion swap occurs.
Because coir’s negative sites have a much stronger electrostatic preference for divalent ions, they instantly snap calcium and magnesium out of the liquid solution, locking them tightly to the fiber walls. In exchange, the coir dumps its pre-loaded sodium and potassium directly into the water around your roots.
Your plants are left starving for calcium and magnesium while simultaneously getting hit with high osmotic pressure from excess salt, leading to rapid root tip dieback and scorched growth.
How to Use Coco Coir in Your Garden (Step by Step)
How do we permanently disable this nutrient-stealing lockout mechanism? The answer is simple: we must force the coir to complete its ion exchange before we ever introduce a plant.
A common myth in beginner forums is that you can simply rinse raw coir with standard tap water; this is completely false. Fresh water can wash away loose, unbound surface salts, but it lacks the chemical strength to break the electrostatic bonds holding sodium and potassium to the exchange sites.
For repeatable, professional-grade results, you must implement a manual double-buffering protocol utilizing concentrated calcium nitrate and magnesium sulfate.
Step 1: The Hydrological Wash:
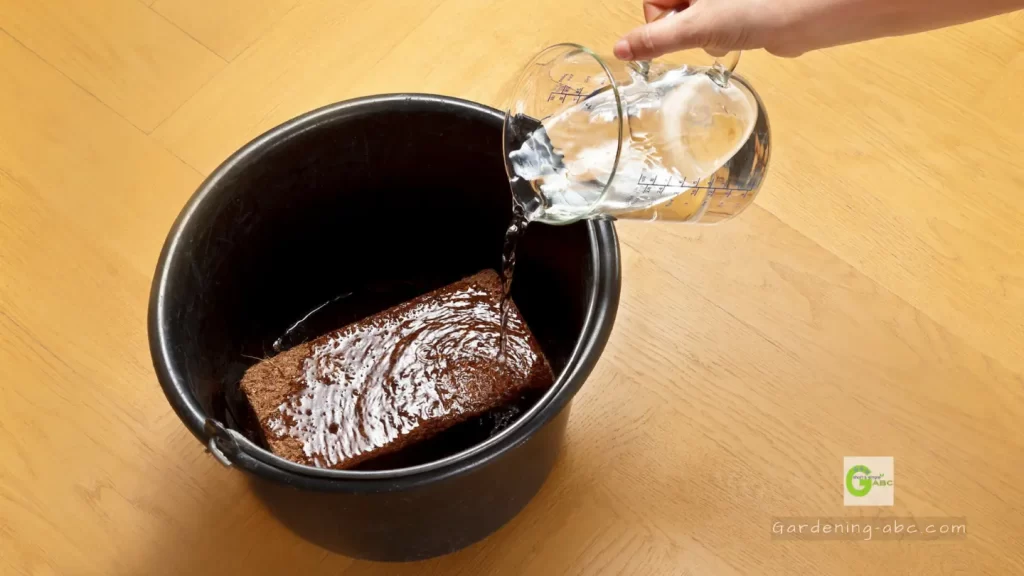
- Place your compressed coir brick into a large container.
- Add clean, dechlorinated water at a strict 5:1 water-to-brick volume ratio.
- Allow the brick to expand completely over a few minutes, breaking it apart with your hands or a trowel.
- Thoroughly drain the water out.
- Repeat this fresh rinse a second time.
- Use an EC meter to test the drained water; your target is a runoff EC ≤ 0.8 mS/cm above your source water. This crucial step completely flushes out all unbound surface salts and fine debris.
Step 2: The Primary Calcium Nitrate Soak:
This is where the core chemistry takes place.
- Prepare a high-strength buffering solution by dissolving 15 grams of horticultural-grade calcium nitrate (15.5-0-0, 19% Ca) for every single kilogram of dry coir you began with (or mix a standard 5 g/L solution for home setups).
- Submerge the rinsed coir completely in this calcium-rich bath, weighing it down if necessary.
- Let it soak undisturbed for a minimum of 8 hours, though 24 hours is optimal.
- Over time, the overwhelming abundance of calcium ions will forcefully displace the chemically bound sodium and potassium, permanently saturating the coir’s exchange sites.
- Drain the solution completely and discard it—do not reuse it, as it is now heavily contaminated with flushed sodium.
Step 3: The Secondary Magnesium Buffer & Final Rinse:
- To ensure complete ionic stability for heavy-feeding crops, prepare a secondary buffering solution consisting of 2 g/L calcium nitrate mixed with 1 g/L Epsom salt (magnesium sulfate).
- Submerge the coir and let it soak for an additional 2 hours. This step perfectly balances the calcium-to-magnesium ratio across the substrate.
- Finally, drain the coir and rinse it one last time with fresh, clean water until your runoff EC drops cleanly below 0.5 mS/cm above your source baseline, and your pH lands perfectly between 5.8 and 6.3.
Your coir is now chemically stable, fully buffered, and ready for planting!
Perfect Mixing Ratios for Different Plants
Once your coco coir is thoroughly washed and beautifully buffered, it serves as a blank canvas. You can engineer its physical structure to align perfectly with your chosen cultivation methodology, local climate conditions, and irrigation style.
Coir is incredibly versatile, performing exceptionally well as either a high-frequency sterile hydroponic substrate or as the foundational organic base for a thriving living soil ecosystem.
The Hydroponic Performance Blend:
Optimized for automated drip systems, ebb-and-flow setups, or hand-watering multiple times daily. To achieve maximum vegetative growth rates, blend 70% buffered coir (a mix of pith and fiber) with 30% coarse horticultural perlite (#3 or #4 grade).
This structure creates aggressive drainage channels and eliminates any risk of a perched water table. Because buffered coir is entirely inert nutrient-wise, you gain complete, absolute control over your plants’ diet, allowing you to deliver precise, tailored liquid nutrient solutions directly to the root zone with every watering event.
The Regenerative Living Coir Mix:
For organic gardeners who want a self-sustaining, microbially active soil ecosystem without relying on synthetic chemical fertilizers.
Unlike traditional peat moss, which naturally acidifies soil over time and demands heavy additions of powdered limestone, buffered coir maintains a highly stable, neutral pH and resists physical compaction season after season.
To build a premium organic living mix, utilize the following precise ratios:
- 50% Buffered Coco Coir (Pith + Fiber Blend): Functions as the foundational moisture and CEC reservoir.
- 20% Premium Earthworm Castings: Acts as a powerful microbial inoculant and gentle, slow-release nutrient source.
- 15% Coarse Perlite or Pumice: Insures long-term structural aeration and structural integrity.
- 10% Charged Biochar: Provides permanent, highly porous structural habitats for beneficial microbes and expands long-term CEC.
- 5% Dry Organic Amendments: A rich blend of kelp meal, neem seed meal, and crustacean meal to fuel primary biological fertility.
How to Correctly Add Nutrients to Coco Coir
your newly washed and buffered coco coir as a perfectly clean, empty dinner plate. Unlike traditional backyard soil—which behaves like a pre-stocked, slow-release holiday buffet—inert coco coir provides your plant roots with absolutely zero nutritional snacks out of the box.
Every single atom of nitrogen, phosphorus, potassium, and micronutrients your plants need to build lush green leaves and heavy fruits must come directly from your hand. If you water your coir with plain, un-supplemented water, you aren’t just starving your crops; you are actively stripping away that precious calcium buffer we worked so hard to build.
So, how do we correctly spoon-feed our root zone without causing a toxic chemical traffic jam?
Synthetic vs. Organic Feeding: Choosing Your Cultivation Philosophy
Before you open a single bottle or bag of plant food, you need to decide which highway you want to drive down: the high-speed lane of synthetic hydroponic nutrients, or the scenic, biological route of organic living amendments. Both paths yield spectacular results, but they require entirely different delivery methods.
If you chose the Hydroponic Performance Blend (the 70/30 coir-to-perlite mix), you will want to utilize water-soluble, synthetic liquid nutrients.
Because coir naturally wants to grab hold of specific ions, look for a high-quality nutrient line specifically formulated for “Coco” or “Hydroponics.”
These specialized formulas are purposefully engineered with elevated baseline levels of chelated iron, calcium, and magnesium to account for the substrate’s natural tendencies.
In this setup, your feeding strategy is simple: every single time you water, you add nutrients. Think of it like a hospital IV drip; we never give the plants a “break” with plain water, because doing so causes a volatile drop in root-zone electrical conductivity (EC), shocking the plant’s metabolic engine.
Conversely, if you built a Regenerative Living Coir Mix, you aren’t feeding the plant directly at all—you are feeding the microscopic soil workforce.
Instead of mixing liquid chemical salts into a watering can every morning, you top-dress or pre-blend dry, raw organic amendments like bat guano, kelp meal, feather meal, and bone meal into the coir.
Your beneficial Trichoderma fungi and local soil bacteria will slowly chew on these complex organic materials, breaking them down into a simple, plant-available ionic soup.
When cultivating organically in coir, you water with plain, dechlorinated water, allowing the living ecosystem to regulate the nutrient release naturally.
The Mixing Sequence Matrix: Preventing Nutrient Fallout
If you are running a hydroponic or liquid-feeding routine, you cannot just throw your nutrients into a bucket simultaneously and stir. Doing so triggers an immediate chemical catastrophe known as nutrient precipitate or “fallout”—where individual elements bound together, turn into a useless white sludge at the bottom of your tank, and become completely unavailable to your plant. To avoid this, you must follow a strict, unyielding mixing sequence inside your reservoir:
- The Water Baseline Check: Start with clean, lukewarm water. If you are using reverse osmosis (RO) or ultra-pure tap water, your starting EC should be close to 0.0 mS/cm.
- Silica First (Optional): If you use a silicon supplement to strengthen your plant’s cell walls against hot balcony winds, add it to the water first. Stir vigorously and let it sit for 5 minutes to completely dissolve; silica is highly alkaline and will cause other nutrients to lock up if it isn’t thoroughly diluted.
- The Cal-Mag Anchor: Next comes your dedicated Calcium-Magnesium supplement. Even though your coir is pre-buffered, adding a baseline dose of 1 to 2 mL per gallon of Cal-Mag ensures there is always a free floating surplus of these ions in the water, completely preventing any localized mid-cycle lockout.
- Base Nutrients (Part A, then Part B): Add your primary macro-nutrients. If your brand utilizes a multi-part system, always add “Part A,” stir completely, and only then add “Part B.” Never mix Part A and Part B together in their concentrated forms!
- Additives and Enzymes: Now you can drop in your specialized root stimulants, flower boosters, or B-vitamins.
- The Final pH Calibration: Once everything is thoroughly mixed, drop your pH meter into the bucket. Your targets are incredibly precise: for hydroponic coir feeding, adjust your liquid to a sweet spot of 5.8 to 6.2 using a few drops of pH Up or pH Down. This specific window ensures that every single essential element remains chemically unstable enough to easily slide right through the root cell walls.
Watering Your Plants in Coco Coir
If there is one absolute command that every single grower must internalize, it is this: never, under any circumstances, treat coco coir like regular soil! Standard field soil or peat-based potting mixes actively benefit from distinct wet-dry cycles, where you allow the pot to dry out significantly between waterings to drag fresh oxygen down into the soil.
However, allowing buffered coco coir to dry out until the pot feels lightweight is a critical mistake that triggers three simultaneous, devastating biological breakdowns.
- First, dry coir undergoes a severe physical phenomenon known as hydrophobic rebound; once it dries completely, the organic fibers tightly lock up and aggressively repel water, causing future waterings to simply channel down the inside edges of the pot while leaving the center bone-dry.
- Second, as moisture evaporates from the pot, the dissolved fertilizer salts become hyper-concentrated, causing an immediate, massive EC spike that chemically scorches delicate root hairs.
- Third, drying causes a critical cation reversion, where the shifting electrical charges cause the exchange sites to break their bonds with calcium and re-adsorb sodium.
To avoid these issues, keep your coir consistently saturated.
In hydroponic setups, irrigate 2 to 5 times daily to maintain a luxurious 80% to 90% saturation level, always watering until you achieve a 15% to 20% runoff volume to flush away residual salts.
In organic living coir mixes, water consistently every 1 to 2 days, never allowing the top surface to crack or separate.
Here’s something super important that a lot of gardening guides gloss over: because coco coir is essentially inert, your plants won’t get any nutrients from it the way they might from rich garden soil or compost-amended mixes. You need to feed them — and feed them correctly.
Monitoring pH and EC
To consistently hit high-performance yields, you must transition from a passive observer to an active quality controller of your root zone chemistry. Make it a mandatory weekly habit to test your input water alongside your pot’s drainage runoff.
If your runoff EC spikes 0.8 to 1.2 mS/cm above your input nutrient solution, it is a clear warning sign of dangerous salt accumulation; immediately flush the medium with a half-strength nutrient solution featuring elevated calcium to safely sweep away the buildup.
If your runoff pH experiences an acidic shift and drops below 5.5—often caused by the plant absorbing ammonium-based nitrogen—flush the pot with clean water adjusted to pH 7.0 until the root zone stabilizes back into the ideal 5.8 to 6.3 hydroponic sweet spot.
The Fungal Ecosystems
On the biological front, coco coir holds a beautiful natural secret: it possesses an incredible, unique affinity for beneficial Trichoderma fungi species, including Trichoderma atroviride and Trichoderma harzianum.
Unlike sterile peat moss, coir’s unique lignin-rich composition serves as a magnificent home for these symbiotic organisms. They rapidly colonize the root zone, forming a dense biological shield that aggressively suppresses devastating soilborne pathogens like Pythium, Fusarium, and Phytophthora.
Recent 2025–2026 research confirms that establishing a robust Trichoderma network inside cocopeat directly boosts aboveground plant biomass, sharpens leaf pigment concentrations, and increases overall flower numbers.
To maximize this biological advantage, inoculate your coir with a high-quality commercial Trichoderma product at transplant, integrate charged biochar-vermicompost blends into your mix, and strictly avoid harsh synthetic fungicides.
Always stay alert: if your pots ever emit a sour, putrid, rotten-egg smell, it is a critical warning that anaerobic bacteria have outcompeted your beneficial fungi due to stagnant water—immediately cut your watering frequency and mix in 20% more coarse perlite to restore vital oxygen airflow.
Global Coir Market: Trends, Shortages, and Future Outlook
As we advance through mid-2026, the global coconut coir market is experiencing historic structural momentum and unprecedented supply chain shifts. Valued at approximately USD 416–470 million in 2025, the global coir market is expanding at an explosive Compound Annual Growth Rate (CAGR) of 8.1% to 8.5%, on track to surge past USD 972 million by 2034.
This intense commercial demand is fueled by a massive global agricultural transition; in 2026 alone, the adoption of coir-based growing substrates increased by an astonishing 21% across commercial farms in Southeast Asia, supported by a simultaneous 17% rise in organic agricultural land use across the Asia-Pacific region.
Commercial growers are rapidly abandoning traditional soils in favor of precision-graded, crop-specific coir particle blends tailored specifically for high-yield berries, tomatoes, and leafy greens.
However, 2026 is also shaping up to be a highly challenging year characterized by tight global supplies and severe macro-environmental disruptions.
A series of intense, unpredictable unseasonal monsoons across major processing hubs in India and Sri Lanka has severely halted traditional outdoor coir washing, curing, and drying operations. Simultaneously, record-breaking, heavy rainfall across the Baltic region has severely crippled European peat moss extraction.
This double environmental supply squeeze means that home gardeners and commercial cultivators alike are facing tight availability, extended shipping lead times, and rising retail prices for premium, pre-buffered bagged coir.
In this volatile 2026 market landscape, mastering the manual laboratory-grade double-buffering protocol at home becomes an invaluable skill. It empowers you to bypass expensive commercial retail shortages by converting cheap, basic raw commodity coir bricks into ultra-premium, chemically flawless, high-performance growing gold with your own hands.
Conclusion: Is Coco Coir Worth It?
Transitioning away from passive, unpredictable traditional dirt growing to active, engineered substrate management is the single most impactful adjustment a modern grower can make. Coconut coir represents the absolute pinnacle of this paradigm shift.
When you properly respect its underlying chemistry through systematic double-buffering, and carefully sculpt its physical aeration using precise textural blends, coir delivers the explosive growth rates and flawless nutrient control of pure water hydroponics, while retaining the forgiving, resilient safety net of a traditional growing medium.
By implementing a strict 5-point quality checking index before every planting—verifying low runoff EC, ensuring calcium dominance, testing structural crumble, auditing drainage porosity, and maintaining a solid fallback plan—you effectively eliminate the variables that cause crop failure.
The raw data and historical performance metrics from top-tier growers do not lie. Cultivators who systematically adopt this blueprint consistently report a 30% to 50% reduction in mid-cycle calcium and magnesium nutrient deficiencies, rapid root colonization with visible root tips hitting container edges within 7 to 10 days, and completely clean, repeatable, high-yielding runs from seed or clone through to a bumper harvest.
You now possess the comprehensive engineering manual. Step away from the outdated limitations of traditional soil, master the elegant chemistry of the coconut husk, and watch your garden reach its ultimate biological potential.
For full information on how to sterilize coco coir see this post
Frequently Asked Questions (FAQs)
1. Can I reuse coco coir after a harvest?
Yes! Unlike soil, which compacts and loses its “soul,” coir can be washed, re-buffered with Cal-Mag, and used again for 2-3 years. Just make sure to remove any old root mass.
2. Does coco coir ever expire?
In its compressed, dry state? It’ll last longer than your favorite pair of jeans. Once hydrated and mixed with organic matter, it eventually breaks down, but we’re talking years, not months.
3. Why are my leaves turning yellow in coco coir?
Check your “Cal-Mag.” Because coir binds to Calcium and Magnesium, your plant might be deficient even if you’re feeding it. A dedicated Cal-Mag supplement usually fixes this in days.
4. Is coco coir safe for pets?
Generally, yes. It’s just coconut husk. However, don’t let Fido make a meal of it—it’s a massive amount of fiber that can cause digestive blockages if eaten in large quantities.
5. Can I mix coco coir with regular garden soil?
You certainly can. It’s an excellent way to “fluff up” heavy clay soil or help sandy soil hold onto water. Think of it as a permanent conditioner for your earth.
Amazon and the Amazon logo are trademarks of Amazon.com, Inc, or its affiliates.
Coir has really great qualities and usages for seed starters, bedding, gardens…. all agriculture needs. Great!!!!!!!……
Thanx and you are absolutely right. 🙂
Thanks a lot , you are absolutely right.
But there is availablity issue atleast in north !!!!!
I use cocopeat in my garden alongwith regular soil and sand and has a very good effect on plant growth. Of course, I add some nutrients regularly. — r.k.rajagopalan.
We are Firstlock ltd. We produce high quality coco peat, at very competitive price.
thank you.
I hope you can also feature self-irrigating planters in your next post.
if i have a fresh coir, how do i prepare it to be suitable for vegetable gardening? do i need to have it sun-dried or can i mix it the regular plot soil immediately?
Its nice that you mentioned about adding nutrients. Cocopeat doesn't contain any nutrients for the nutrition of a fully grown plant. So adding nutrients is a must. Try not to add any chemical though. Compost is a very good option.
Things will change very shortly. Some companies have started the whole India distribution channel.
Thanks for the suggestion. I will definitely give it a thought.
Fresh coir contains high amount of electrolytes. This needs to be washed out and sun dried several times before using. It can be a tedious job.
I use about 1 part in 3 coconut coir in my seedling germination mixes with compost, soil and a bit of charcoal. It's great stuff and I highly recommend it.
Yes Coconut Coir and its use as a Soil-less Growth Media Plant..I agree with Your Article.
Thanks & Regards Coco peat supplier
We are taking commercial crop on cocopeat slab under strict IPM measures in Saudi Arabia. Quite promising results.
We are commercial vegetable producer in Saudi Arabia. Growing cucumber, tomatoes on cocopeat slab very healthy without prblem – quality, bumper harvest with color, taste n flavor.
This comment has been removed by the author.
Does the ph of coconut coir reduce over a period of time (like 6 months)? I have been using soilless media having coconut coir, vermiculite, humic acids main ingredients. I didn't check ph initially but when yield was not good, I checked the ph and found it to be 4.5. Please let me know your opinion.
One more query please, should the loose coco coir available in bags at gardening shop also be washed and sun dried before using as plant media?
4.5 is very acidic for plants to grow. Try adding some lime to increase the pH level.
Loose cocopeat is generally the sterilized one. You don't need to wash and sundry it. But check the EC level before purchasing. Low EC is better for the plants.
Dear Sir
Kindly Explain the Process of Making Coco Peat ( Washed & Unwashed).
Dear Sir
Do Have any idea that how much Quantity of Fiber & Coco Peat can be Produced per Husk on an Average?
Dear Sir
What is shelf life of coco peat ?
Mr. Azimi,
Where can I find Coco peat in Saudi Arabia?
This comment has been removed by the author.
Agrihypermart As per the Coir Board it is 600kg of peat and 150 kg of fibre for 1000 husk. I am starting a composite unit for cocopeat and fibre very soon i will let you know exactly
This comment has been removed by a blog administrator.
This comment has been removed by a blog administrator.
Your composing is purely awe-inspiring that I desired to read such high quality material…The Tree Center
Can I add Coco Peat to soil in the field for planting tomato? It's summer here and adding coco peth so that it can hold water. What is the standard process of adding to soil in the field? What's ratio?
Thanks.
Great sharing! It is truly essential that knowing the health benefits of coconut and coconut oil. Everyone should aware of its benefits and important functional advantages.
http://vashiniexports.com/
Mr. Akram,
In my opinion you need to Import it from other countries like India , Sri Lanka etc…
Can coir can be used as a material for concrete to have additional strength??
Can anyone help me out with the process of making Coco peat,i am planning to start this as a business so what sort, of machines i need and where can i buy and someone pls advice me.Thanks
hi
where your contry?
Am in the business already, I can put u through in the process. Do you have buyers already?.
Great post! Have nice day ! 🙂 vfyes
Great post! Have nice day ! 🙂 1f5bw
Great post! Have nice day ! 🙂 a2ooj
thanks for sharing your thoughts
I am in fact glad to glance at this website posts which consists of lots of useful information, thanks for providing these kinds of data.