We use affiliate links to run our site. When you buy through links on our site, we may earn an affiliate commission, without any added cost to you. Learn more
Before You Start: Do You Have What Watermelons Need?
Watermelons are rewarding to grow, but they’re not forgiving. Before investing time and money, make sure you can check all these boxes:
- ✅ Full sun exposure — 6–8 hours of direct sunlight daily (non-negotiable).
- ✅ Space — Vines spread 15–20 feet horizontally (or 8–10 feet if trellised).
- ✅ Warm climate — Soil temperature must reach 70°F+; USDA zones 3–11 with 70+ frost-free days.
- ✅ Consistent water access — You can water 1–2 times per week without fail.
- ✅ Patience — 80–90 days from seed to first harvest.
- ✅ Budget — $15–30 for seeds/transplants, soil amendments, and fertilizer.
If you can’t check all boxes, don’t worry. Scroll to the “Growing Watermelons in Containers” section for apartment-friendly alternatives.
When to Plant Watermelons: Regional Timing Guide
The #1 beginner mistake is planting at the wrong time. Here’s exactly when to plant in your region:
| Region | Last Frost Date | Plant Seeds Indoors | Transplant Outdoors | First Harvest |
| South (TX, FL, GA, LA) | Feb–Mar | Dec–Jan | Feb–Mar | May–Jun |
| Midwest (IL, OH, MI, WI) | May 1–15 | Mar–Apr | May–Jun | Aug–Sep |
| Northeast (NY, PA, MA, VT) | May 15–Jun 1 | Apr–May | Jun–Jul | Sep–Oct |
| West (CA, AZ, NV, UT) | Mar–Apr | Jan–Feb | Mar–Apr | Jun–Jul |
| Pacific Northwest (WA, OR) | Apr–May | Feb–Mar | May–Jun | Aug–Sep |
Find your exact frost date: Visit planthardiness.ars.usda.gov and enter your zip code.
Critical rule: Never plant watermelon seeds or transplants until soil temperature reaches 70°F. Cold soil causes seeds to rot.
Don’t guess when to plant — measure. A $8 soil thermometer tells you when your soil hits 70°F (the magic number for watermelon seeds). No more rotting seeds or failed transplants. Check current price
Watermelon Varieties: Which Type Should You Grow?
Watermelons come in four main types. Choose based on your space, family size, and climate:
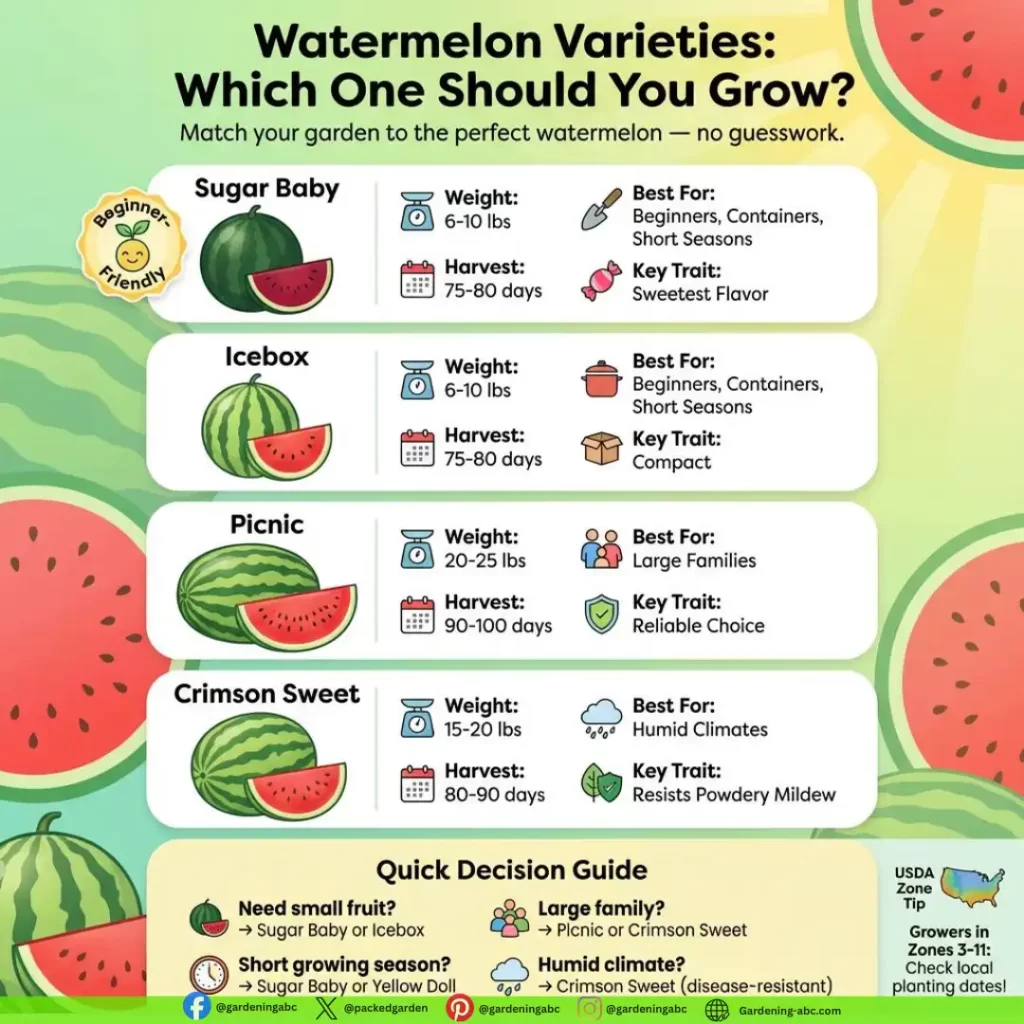
Picnic Watermelons (Large)
- Weight: 15–50 pounds
- Shape: Round or oblong
- Days to maturity: 85–90 days
- Best for: Large families, canning, sharing
- Beginner tip: Needs 5 feet of space between plants; more prone to powdery mildew in humid climates
Popular varieties: Crimson Sweet, Black Diamond, Charleston Gray
Icebox Watermelons (Small)
- Weight: 5–15 pounds
- Shape: Rounded
- Days to maturity: 70–75 days
- Best for: Small families, apartments, containers
- Beginner tip: Faster to mature; perfect for short growing seasons
Popular varieties: Sugar Baby, Yellow Doll, Minilove
Sugar Baby Watermelons (Extra Small)
- Weight: 6–10 pounds
- Shape: Rounded with dark green rind
- Days to maturity: 75–80 days
- Best for: First-time growers, containers, individual servings
- Beginner tip: Sweeter than larger varieties; highest success rate for beginners
Sweet Beauty Watermelons (Specialty)
- Weight: 8–12 pounds
- Shape: Oblong with green and darker stripes
- Days to maturity: 80–85 days
- Best for: Gardeners wanting unique varieties
- Beginner tip: Less common; may be harder to find seeds
Our recommendation for beginners: Start with Sugar Baby or Icebox varieties. They mature faster, take up less space, and have higher success rates.
Seeds vs. Transplants: Which Should You Choose?
This is the most confusing decision for beginners. Here’s the truth:
Start from Seeds If:
- You have 8–10 weeks before your first frost date
- You want to save money ($2–3 per plant vs. $4–6 for transplants)
- You’re growing 5+ plants
- You have indoor space under grow lights (optional but helpful)
Buy Transplants If:
- Your growing season is short (less than 70 frost-free days)
- This is your first time growing watermelons
- You only need 1–3 plants
- You want the highest success rate
Our Recommendation for Beginners: Buy 2–3 Transplants
Purchase transplants from a local nursery or garden center in late spring (after your last frost date). You’ll have a 90% success rate and fruit by August with minimal effort.
Why transplants are beginner-friendly:
- No guessing about germination
- Shorter growing season needed
- Less risk of seed rot or damping-off disease
- You can see what you’re buying
How to Grow and Take Care of Black Diamond Watermelons
How to Choose & Prepare Your Growing Site
Sunlight Requirements
Watermelons are sun worshippers. They need 6–8 hours of direct sunlight daily. Less sun means:
- Slower growth
- Smaller, less sweet fruit
- Higher disease risk
Test your site: Stand in the location at 9 AM and 3 PM. If you see shadows from trees or buildings, find another spot.
Soil Drainage
Watermelons hate wet feet. If your garden floods after heavy rain, choose a different location or build a raised bed.
Quick drainage test: Dig a hole 12 inches deep, fill with water, and check after 24 hours. Water should drain completely. If it’s still there, the soil is too compacted.
Space Requirements
Watermelon vines are aggressive growers. They need room to sprawl:
- Ground growing: 3–5 feet between plants (vines reach 15–20 feet)
- Trellised growing: 2–3 feet between plants (vines grow vertically)
- Container growing: One plant per 20–30 gallon pot
Pro tip: If space is tight, trellis your watermelons vertically using stakes or a sturdy fence. Use old pantyhose or fabric strips to support developing fruit.
Soil Preparation: The Foundation of Success
Watermelons are “voracious eaters.” They need rich, well-draining soil to produce sweet, juicy fruit.
Ideal Soil Type
- Texture: Sandy loam or loamy soil (not heavy clay)
- pH level: 6.0–6.8 (slightly acidic)
- Drainage: Water should drain within 24 hours
Soil Testing (Highly Recommended)
Don’t guess. Buy a $15 soil test kit from any garden center, or send a sample to your local university extension office ($10–20). You’ll learn:
- Current pH level
- Nitrogen, phosphorus, potassium levels
- Organic matter percentage
- Specific amendment recommendations
How to Amend Your Soil
If you have clay soil: Mix in 2–3 inches of well-rotted manure or compost into the top 8–10 inches of soil. This improves drainage and adds nutrients.
If you have sandy soil: Add 1–2 inches of compost to improve water retention.
For all soil types:
- Add 1 cup of compost per planting hole
- Mix in 1 tablespoon of balanced fertilizer (10-10-10) per hole
- Work amendments into soil 1–2 weeks before planting
Best amendment sources:
- Well-rotted manure (aged 6+ months; fresh manure burns plants)
- Finished compost (dark, crumbly, earthy-smelling)
- Peat moss or coconut coir (for water retention)
- Perlite (for drainage in clay soils)
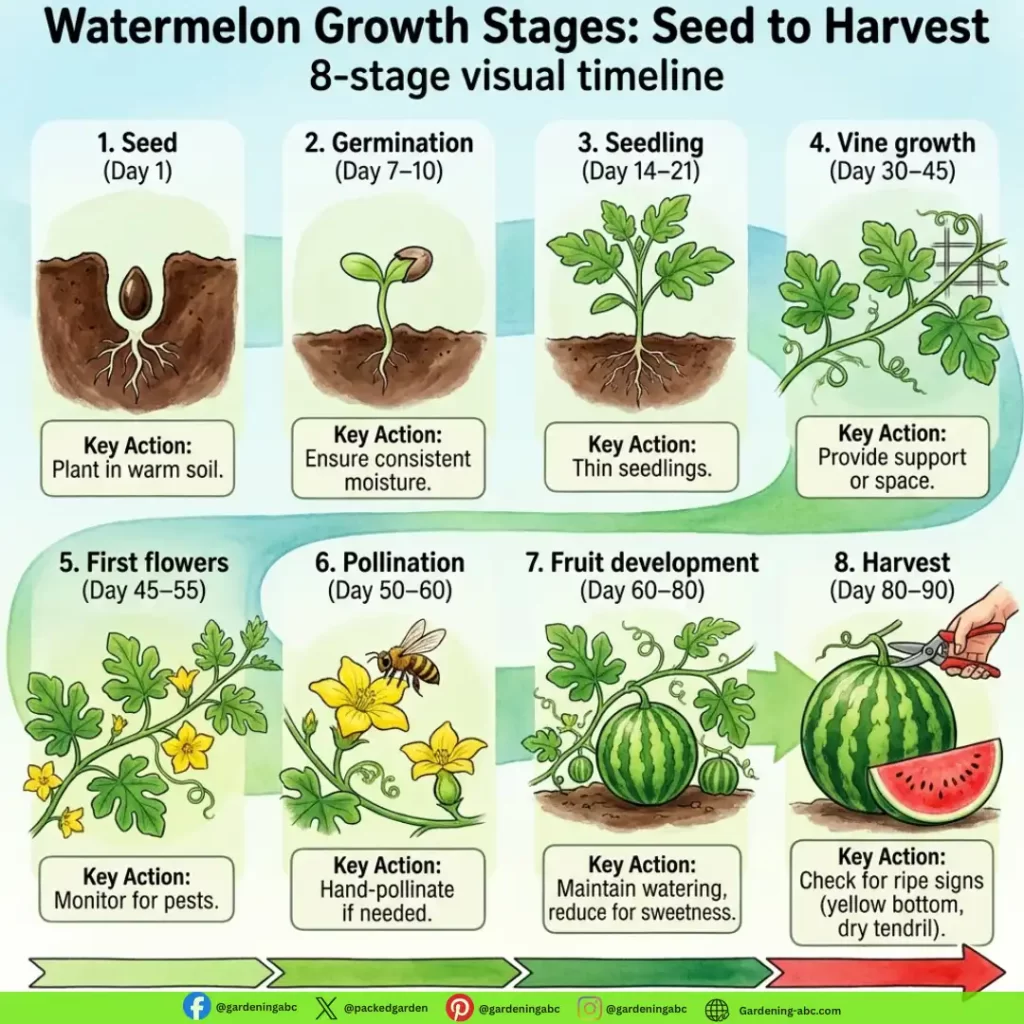
Starting from Seeds: Step-by-Step Instructions
Option 1: Direct Sowing (Seeds Planted Outdoors)
Best for: Gardeners with 80+ frost-free days and warm climates.
What you need:
- Watermelon seeds (open-pollinated heirloom varieties, NOT hybrid seeds from store-bought melons)
- Prepared soil (see above)
- Watering can
- Soil thermometer
Step-by-step:
- Check soil temperature. Wait until soil reaches 70°F+ (use a soil thermometer). Plant too early and seeds rot.
- Create planting holes. Dig holes 1/2 to 1 inch deep, spaced 3–5 feet apart.
- Plant seeds. Place 2–3 seeds per hole (thin to strongest seedling later).
- Water gently. Keep soil moist (not waterlogged) for 7–10 days until germination.
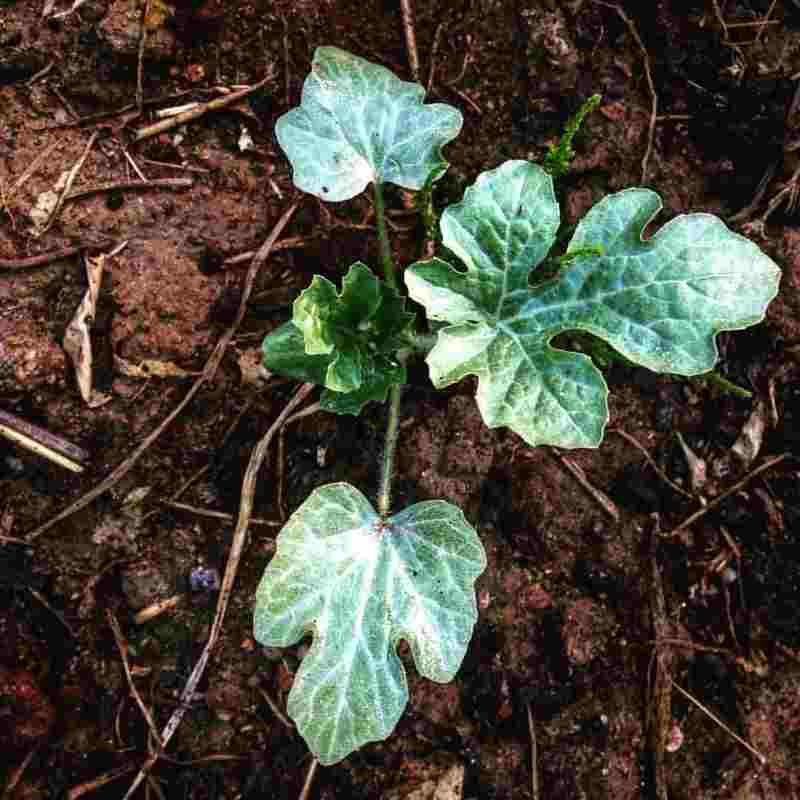
- Thin seedlings. Once seedlings have 2–3 true leaves, remove weaker plants, leaving one strong plant per hole.
- Mulch around plants. Apply 2–3 inches of mulch (straw, wood chips) around the base, keeping it 3 inches away from the stem.
Germination timeline: Seeds sprout in 7–10 days at 70–85°F.
Option 2: Starting Seeds Indoors (For Short Growing Seasons)
Best for: Northeast, Midwest, and Pacific Northwest gardeners with short summers.
What you need:
- Seed starting mix (not garden soil)
- Biodegradable pots (4-inch) or seed trays
- Grow lights or sunny windowsill
- Heat mat (optional but helpful)
- Watering can with fine mist
Watermelon roots hate being disturbed. Plant seeds in biodegradable pots — then plant the whole pot in the ground. No root damage, no stress. See 4-inch peat pots.
Step-by-step:
- Fill pots with seed starting mix. Moisten the mix before filling pots.
- Plant seeds. Place 1–2 seeds per pot, 1/4 to 1/2 inch deep.
- Maintain warmth. Keep soil at 70–85°F. A heat mat speeds germination to 5–7 days.
- Provide light. Once seedlings emerge, give 14–16 hours of light daily using grow lights (keep lights 2–3 inches above seedlings).
- Water carefully. Keep soil moist but not waterlogged. Water from below to prevent damping-off disease.
- Harden off before transplanting. 1–2 weeks before outdoor planting, gradually expose seedlings to outdoor conditions (start with 1 hour in shade, increase daily).
- Transplant outdoors. After last frost date, plant seedlings in prepared soil, spacing 3–5 feet apart.
Timeline: Start seeds indoors 6–8 weeks before your last frost date.
Why NOT to Use Seeds from Store-Bought Watermelons
Most commercial watermelons are hybrids. Seeds from hybrid watermelons won’t produce identical fruit. You’ll waste 80+ days growing a plant that produces disappointing results.
Solution: Buy open-pollinated or heirloom watermelon seeds from reputable seed companies (Johnny’s Selected Seeds, Burpee, Territorial Seed Company).
Buying & Transplanting Seedlings (Easiest for Beginners)
Where to Buy Transplants
- Local garden centers (best option; see plants before buying)
- Nurseries (often have specialty varieties)
- Online seed companies (ships in spring)
What to Look For
- ✅ Stocky, dark green plants
- ✅ 2–4 true leaves (not just cotyledons)
- ✅ Moist soil (not dried out)
- ❌ Avoid leggy, pale, or yellowing plants
- ❌ Avoid plants with visible pests or disease spots
Transplanting Instructions
Critical: Watermelon roots are extremely fragile and sensitive to transplant shock. Handle with care.
- Harden off transplants. If purchased from a greenhouse, gradually expose them to outdoor conditions for 5–7 days before planting.
- Prepare planting holes. Dig holes slightly larger than the root ball, spaced 3–5 feet apart.
- Plant gently. Remove transplant from pot, keeping the root ball intact. Place in a hole at the same depth it was growing in the pot. Do NOT bury the stem.
- Backfill with soil. Gently press soil around the plant. Water immediately.
- Protect from pests. Use row covers to protect young transplants from squash bugs and beetles. Remove covers once plants start flowering (to allow pollinator access).
- Water deeply. Water the soil (not on leaves) to settle the soil and reduce transplant shock.
Pro tip: Transplant on a cloudy day or in late afternoon to minimize stress.
Soil Care: Feeding Your Watermelon Plants
Watermelons are heavy feeders. They need consistent nutrition throughout the growing season.
Pre-Planting Fertilizer
Before planting, mix into soil:
- 1 cup of compost per planting hole
- 1 tablespoon of balanced fertilizer (10-10-10) per hole
- Optional: 1 tablespoon of well-rotted manure per hole
Fertilizing Schedule During Growing Season
Week 1–4 (Growth phase):
- Spray liquid fertilizer every 2 weeks
- Use a balanced formula (10-10-10) or a nitrogen-rich formula (higher first number)
- Follow the product label for dilution rates
Week 5–8 (Flowering & fruit set):
- Switch to phosphorus and potassium-rich fertilizer (lower nitrogen)
- High nitrogen causes excessive vine growth at the expense of fruit
- Spray every 2 weeks
Week 9+ (Fruit development):
- Continue phosphorus and potassium-rich fertilizer
- Reduce nitrogen to near zero
- Spray every 2–3 weeks
Fertilizer Options for Beginners
- Liquid fish emulsion: Easy to apply, good all-purpose option
- Seaweed extract: Boosts fruit sweetness and disease resistance
- Balanced granular fertilizer: Mix into the soil monthly
- Compost tea: Brew finished compost in water for 24 hours, strain, and spray
Pro tip: Excess nitrogen produces leafy vines with small, bland fruit. If your plant is all leaves and no flowers by week 6, you’re using too much nitrogen.
Watering: The Key to Sweet, Juicy Watermelons
Inconsistent watering is the #2 reason watermelons fail. Get this right and you’re 80% of the way to success.
Watering Requirements by Growth Stage
Weeks 1–4 (Establishment):
- Water deeply 2–3 times per week
- Soil should be moist 6 inches deep
- Use a soil moisture meter ($10) to avoid guessing
Weeks 5–8 (Flowering & fruit set):
- Water 1–2 inches per week (about 1–2 times weekly, depending on rainfall and heat)
- Consistent moisture is critical; dry stress causes small fruit
Weeks 9+ (Fruit development):
- Reduce watering slightly (dry weather produces sweeter melons)
- Water 1 inch per week
- Stop watering 1–2 weeks before harvest to concentrate sugars
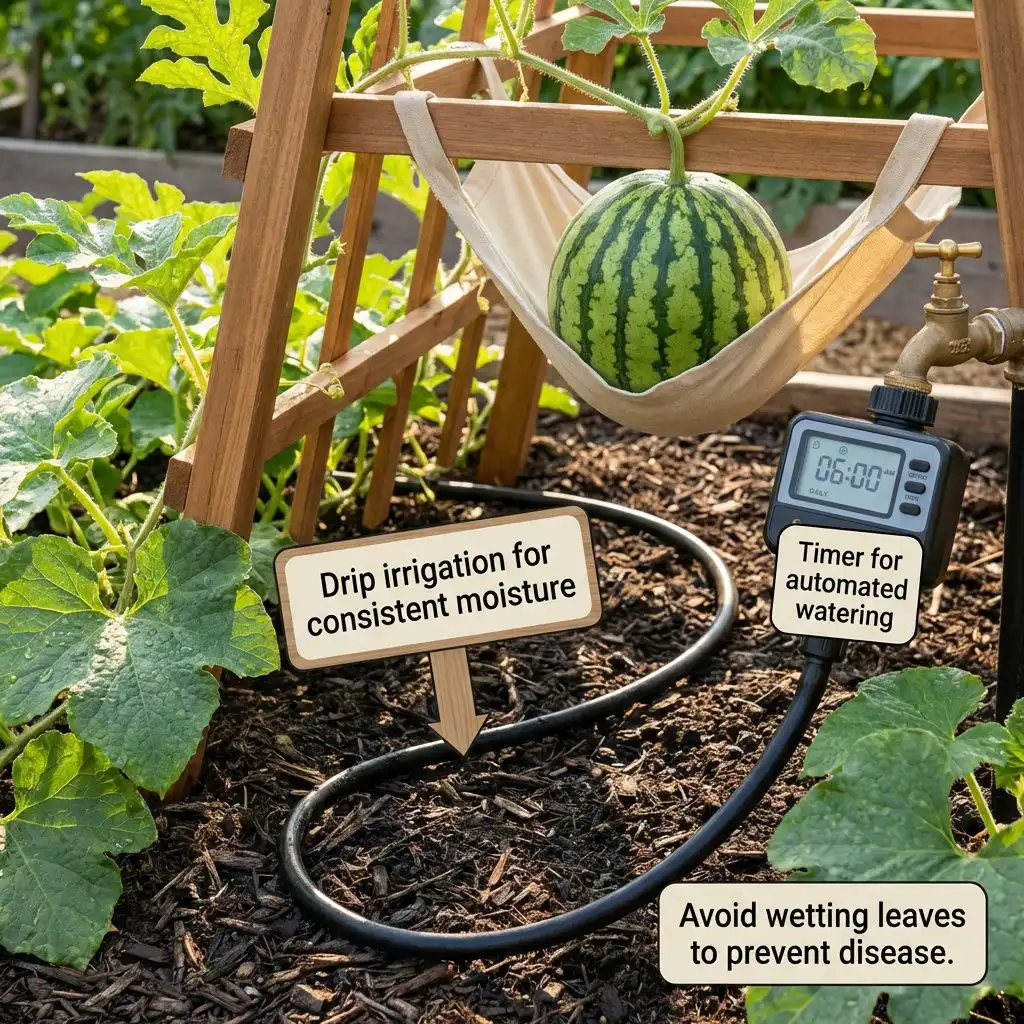
Best Watering Practices
Water at soil level, NOT on leaves:
- Wet leaves cause fungal diseases (powdery mildew, anthracnose)
- Use drip irrigation, soaker hoses, or water at the base of plants
- Avoid overhead sprinklers
Water early in the morning:
- Morning watering allows any accidental leaf wetting to dry quickly
- Reduces disease risk
- Plants have water available during the hot afternoon
Keep soil moist, not waterlogged:
- Soggy soil causes root rot
- Dry soil causes stress and small fruit
- Soil should feel like a wrung-out sponge
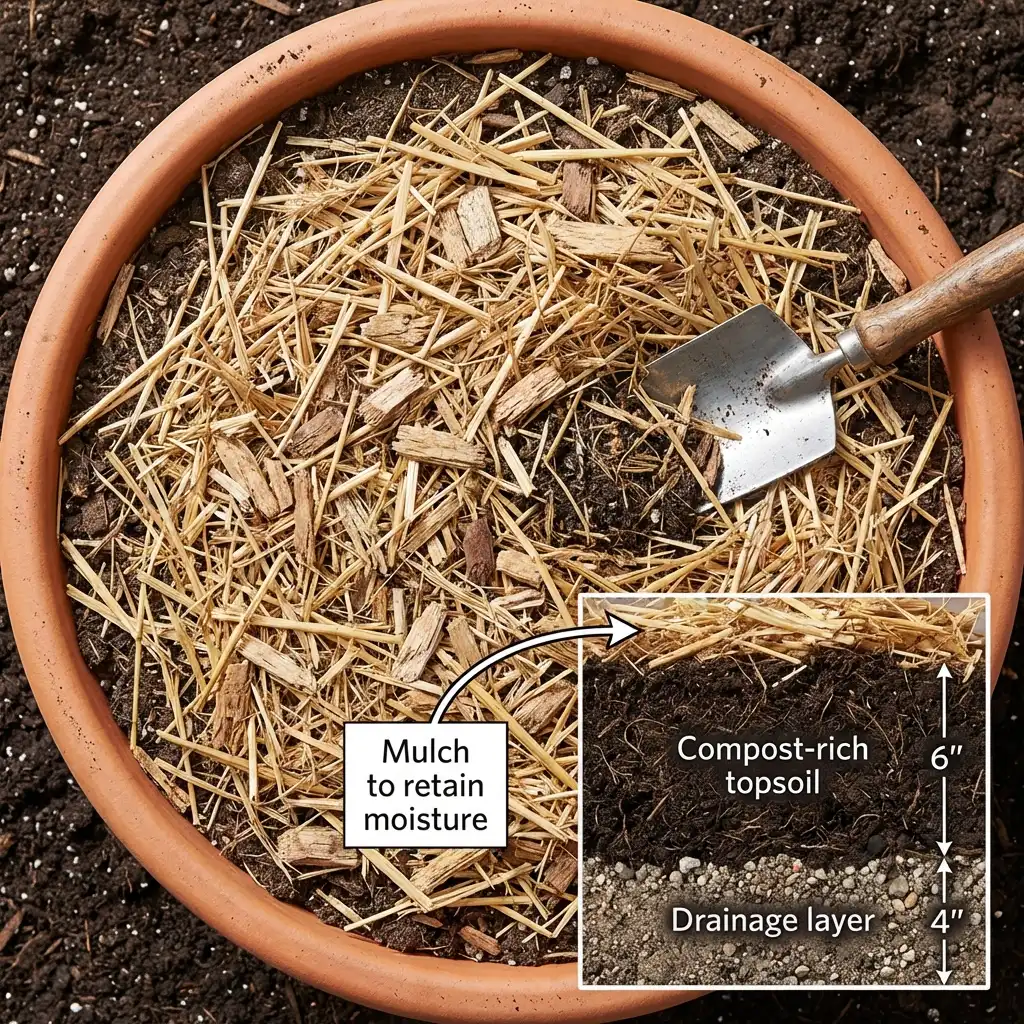
Mulching to Reduce Watering
Apply 2–3 inches of mulch around plants (keep 3 inches away from stem):
Benefits:
- Retains soil moisture (reduces watering frequency)
- Keeps fruit off wet soil (prevents rot)
- Reduces weeds
- Moderates soil temperature
Best mulch materials:
- Straw (not hay, which contains seeds)
- Wood chips
- Shredded leaves
- Black plastic (warms soil in cool climates)
Pollination: Getting Flowers to Set Fruit
Watermelons produce both male and female flowers on the same plant. Only female flowers produce fruit.
Understanding Watermelon Flowers
Male flowers (appear first):
- Thin stem with no bulge at the base
- Produce pollen
- Don’t produce fruit
- Appear 2–3 weeks before female flowers
Female flowers (appear later):
- Thick stem with a small bulge (baby watermelon) at the base
- Produce fruit when pollinated
- Open for only a few hours in the morning
Natural Pollination
Bees, wasps, and other insects naturally pollinate watermelon flowers. To attract pollinators:
- Plant bee-friendly flowers nearby (zinnias, marigolds, sunflowers)
- Avoid pesticides (they kill pollinators)
- Provide a shallow water source (bees need water)
- Leave some flowering weeds (clover, dandelions attract bees)
Hand Pollination (If Pollinators Are Scarce)
If you live in an area with few pollinators (or notice few bees visiting), hand-pollinate:
- Identify female flowers. Look for the small bulge at the flower base.
- Pick a male flower. Remove a male flower (the one with just a thin stem).
- Transfer pollen. Rub the male flower’s center inside the female flower’s center.
- Repeat. Hand-pollinate 3–5 female flowers per plant on the same morning.
- Timing matters. Pollinate early morning (6–9 AM) when flowers are open.
Pro tip: You’ll know pollination worked if the baby watermelon at the flower base starts growing within 3–5 days.
Fruit Development & Support
Once flowers are pollinated, small watermelons begin developing at the flower base.
Supporting Developing Fruit
On the ground:
- Add straw or cardboard beneath developing fruit
- This prevents rot by keeping fruit off wet soil
- Prevents slug and pest damage
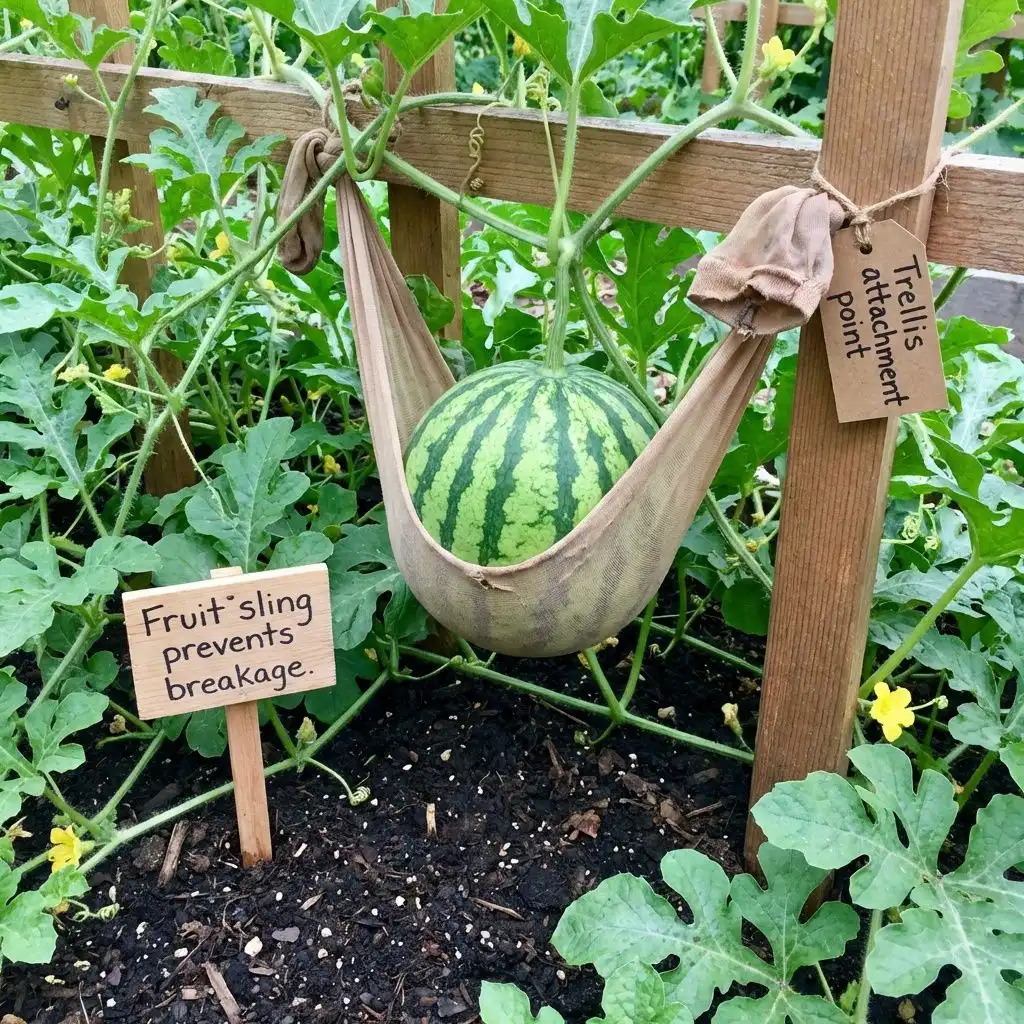
On trellises:
- Use old pantyhose, fabric strips, or slings to support fruit
- Tie slings to the trellis to support the fruit’s weight
- Check slings weekly as fruit grows
Thinning Fruit (Optional but Recommended)
If your plant produces many small watermelons, thin them:
- Leave only 2–3 fruits per plant. Remove smaller or deformed fruits.
- Timing: Thin when fruits are 2–3 inches in diameter.
- Benefit: Remaining fruit grows larger and sweeter.
Identifying & Treating Common Pests
Squash Bugs
Identification:
- Gray or brown shield-shaped insects
- 1/2 inch long
- Cluster on leaf undersides
- Damage: Yellow patches on leaves, wilting
Control:
- Hand-pick bugs and egg clusters (check leaf undersides daily)
- Spray neem oil or insecticidal soap weekly
- Plant radishes as a trap crop (bugs prefer radishes)
- Remove affected leaves
Squash Vine Borers
Identification:
- White grubs inside vines
- Sawdust-like frass (droppings) at vine entry holes
- Sudden wilting of vines despite moist soil
Control:
- Inject Bacillus thuringiensis (BT) into affected vines
- Wrap vine bases with aluminum foil to prevent egg-laying
- Remove severely affected vines to prevent spread
- Plant resistant varieties (some icebox types are resistant)
Striped Cucumber Beetles
Identification:
- Yellow beetles with black stripes
- 1/4 inch long
- Eat leaves, stems, and fruit
- Carry bacterial wilt disease
Control:
- Use row covers on young plants (remove at flowering)
- Hand-pick beetles into soapy water
- Spray spinosad or neem oil weekly
- Plant radishes as a trap crop
Common Diseases & Solutions
Powdery Mildew
Symptoms:
- White or light yellow powder on leaf surface
- Leaves eventually develop holes
- Affects leaves, not fruit
Prevention & treatment:
- Water at soil level (not on leaves)
- Ensure good air circulation (space plants properly)
- Remove infected leaves immediately
- Spray sulfur fungicide weekly (follow label directions)
- Plant resistant varieties (Crimson Sweet is resistant)
Anthracnose (Fungal Disease)
Symptoms:
- Dark brown or black angular lesions on leaves with yellow borders
- Elongated lesions on stems and fruit with sunken centers
- Affects both leaves and fruit
Prevention & treatment:
- Rotate crops every 1–2 years (don’t plant watermelons in same spot)
- Plant only disease-free transplants
- Remove infected leaves and fruit immediately
- Spray copper fungicide weekly (follow label directions)
- Avoid overhead watering
Bacterial Wilt
Symptoms:
- Sudden wilting of leaves despite moist soil
- Vascular discoloration inside stems or roots
- No cure once plant is infected
Prevention:
- Control striped cucumber beetles (they spread the disease)
- Use row covers on young plants
- Plant resistant varieties
- Remove infected plants immediately to prevent spread
5 Common Beginner Mistakes (& How to Avoid Them)
Mistake #1: Planting Too Early
The problem: Cold soil causes seeds to rot. Transplants suffer transplant shock in cold soil.
The solution: Wait until soil reaches 70°F. Use a soil thermometer. This typically happens 1–2 weeks after your last frost date.
Mistake #2: Overcrowding Plants
The problem: Cramped plants have poor air circulation, leading to disease. Vines compete for water and nutrients.
The solution: Space plants 3–5 feet apart for ground growing. Don’t skip this step.
Mistake #3: Overwatering
The problem: Soggy soil causes root rot and fungal diseases. Watermelons prefer moist, not wet, soil.
The solution: Water when the top inch of soil is dry. Use a soil moisture meter. Reduce watering in weeks 9+ to concentrate sugars.
Mistake #4: Harvesting Too Early
The problem: Green watermelons don’t ripen after picking. You’ll bite into a hard, bland melon.
The solution: Wait for the hollow “thump” sound when you tap the melon. See the “Harvesting” section for detailed ripeness indicators.
Mistake #5: Skipping Fertilizer
The problem: Starved plants produce small, bland fruit. Watermelons are heavy feeders.
The solution: Fertilize every 2 weeks during the growing season. Switch from nitrogen-rich to phosphorus/potassium-rich fertilizer once flowering starts.
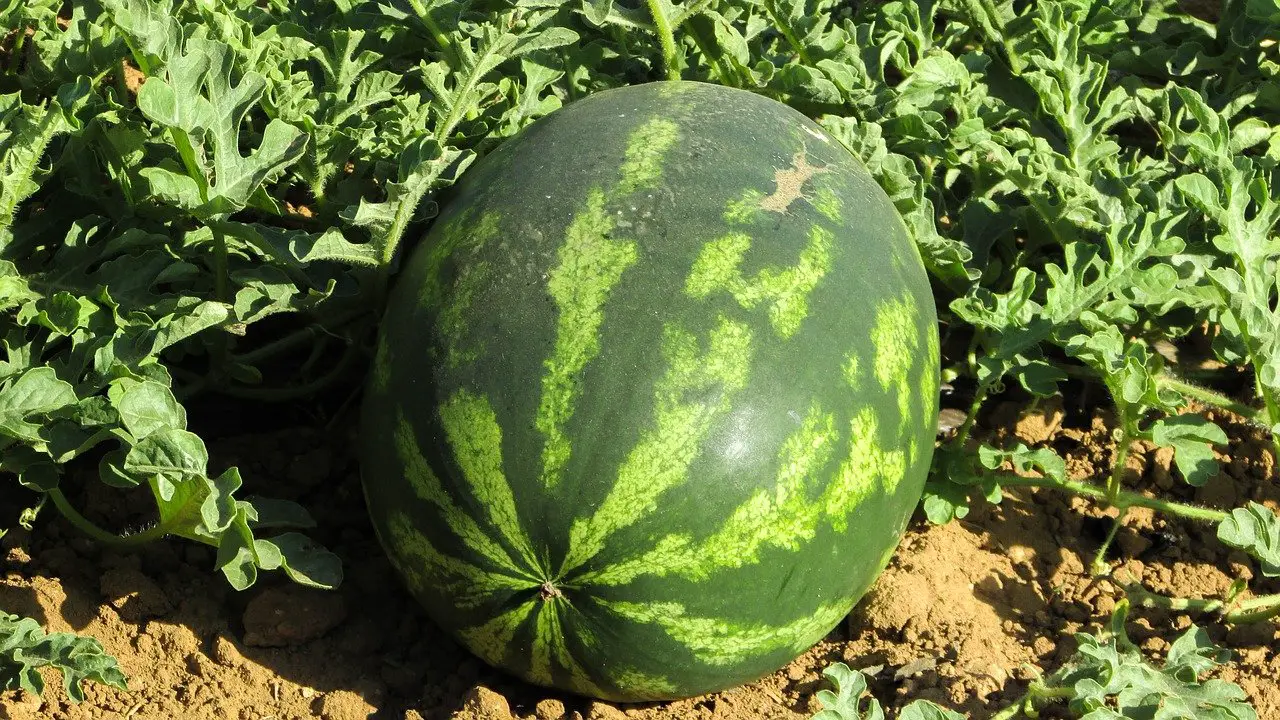
Harvesting Watermelons: When & How
Watermelons don’t ripen after picking. Harvest only ripe melons.
Signs of Ripeness
Look for these indicators:
1. The “Thump Test” (Most Reliable)
- Tap the watermelon with your knuckles
- Ripe watermelon: Deep, hollow sound (sounds like a drum)
- Unripe watermelon: Dull, solid sound
- Overripe watermelon: Flat, dead sound
2. Ground Spot Color
- Where the watermelon touches the ground, look for a pale yellow or cream-colored spot
- Ripe watermelon: Spot is large and creamy yellow
- Unripe watermelon: Spot is white or pale green
3. Tendril Condition
- Check the curly tendril closest to the watermelon stem
- Ripe watermelon: Tendril is brown and dried
- Overripe watermelon: Tendril is completely dead
- Unripe watermelon: Tendril is green and fresh
4. Skin Appearance
- Ripe watermelon: Dull, waxy skin (not shiny)
- Unripe watermelon: Shiny, smooth skin
Harvesting Instructions
- Use a sharp knife. Cut the stem 1–2 inches from the watermelon.
- Don’t pull or twist. Pulling damages the vine and can cause rot in remaining fruit.
- Harvest in the morning. Melons are crispest in the morning.
- Handle gently. Bruises reduce shelf life and quality.
Timeline
- Days to harvest: 80–90 days from seed (or 30–40 days from transplanting)
- Varies by: Variety, temperature, sunlight, water, and fertilizer
- Typical harvest window: 2–3 weeks per plant (multiple melons ripen at different times)
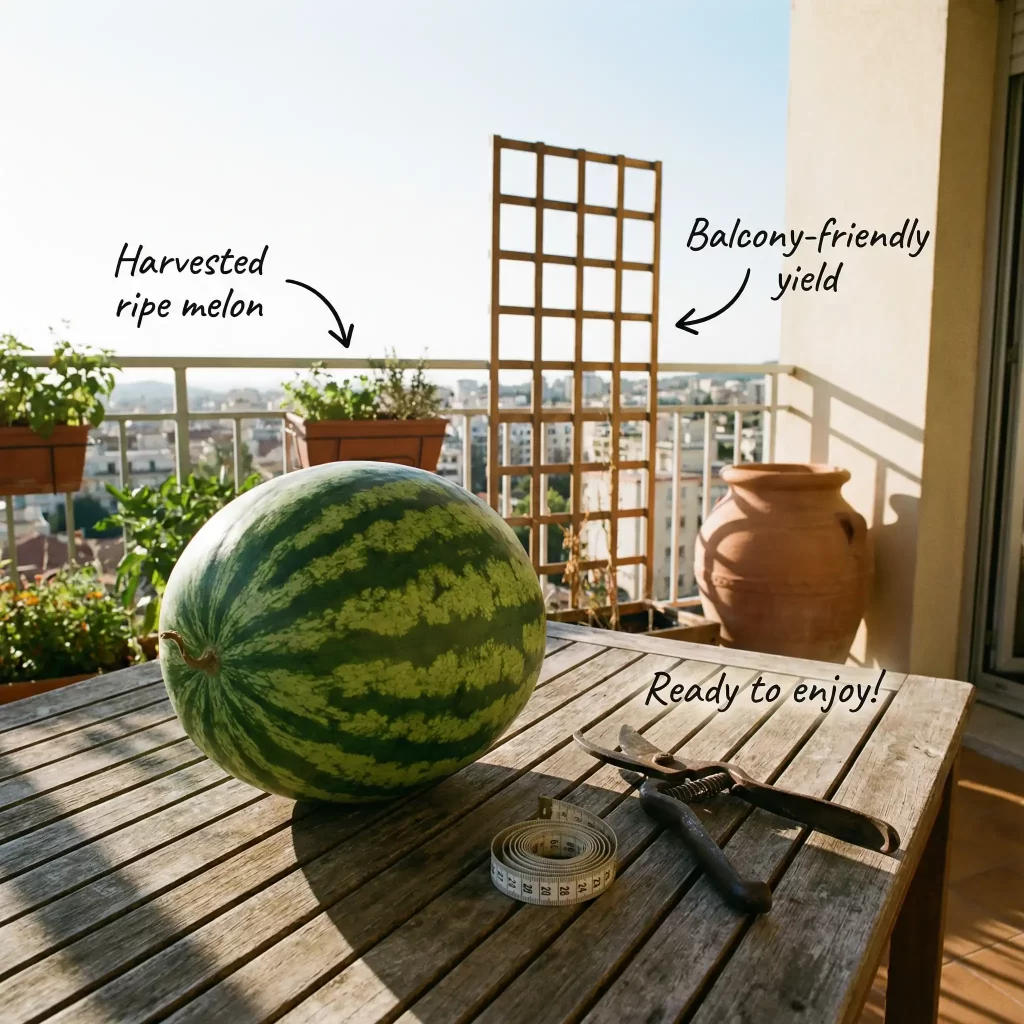
Growing Watermelons in Containers (Apartments & Patios)
Don’t have a backyard? You can still grow watermelons in containers.
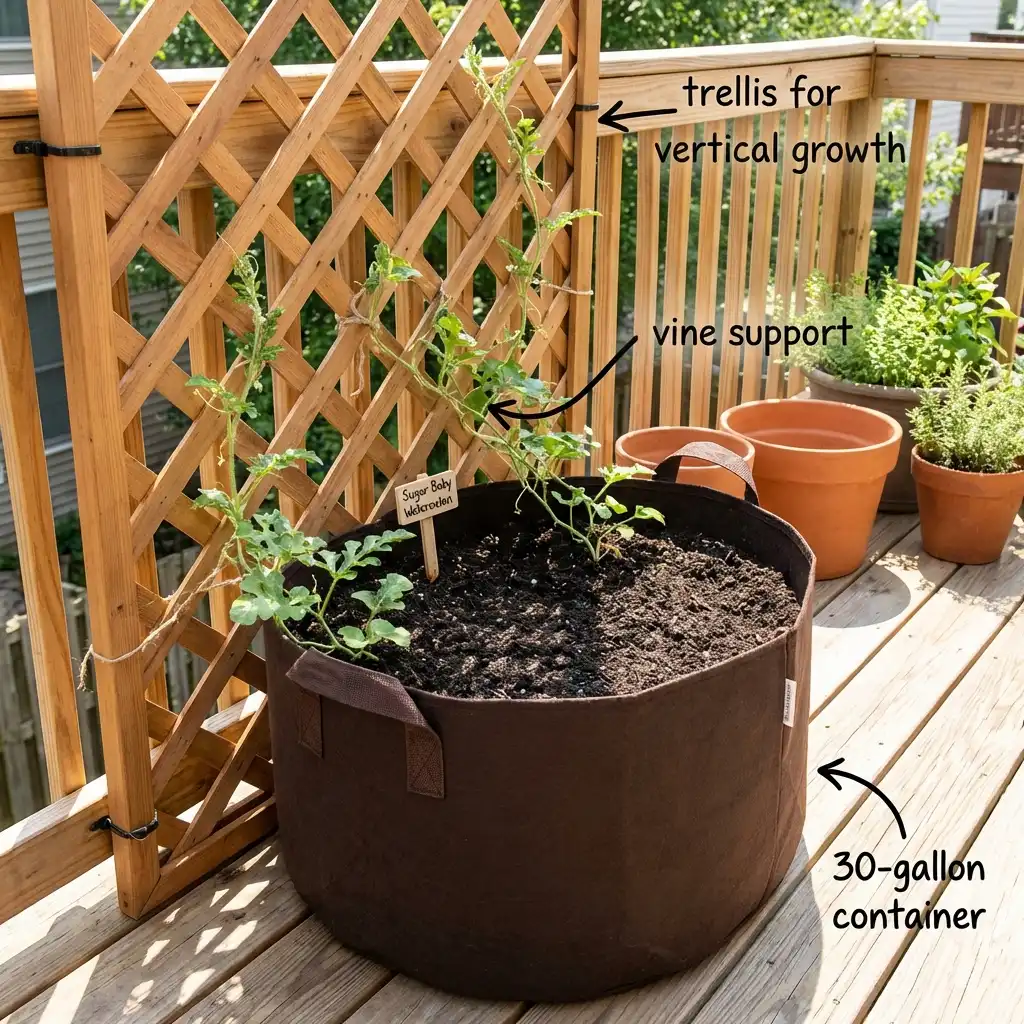
Container Requirements
Pot size:
- Minimum 20–30 gallons per plant
- Larger is better (30+ gallons produces larger fruit)
- Use plastic or fabric pots (easier to move than ceramic)
Soil:
- Use high-quality potting mix (not garden soil)
- Garden soil compacts in containers and drains poorly
- Mix in 1 cup of compost per pot
Drainage:
- Pots must have drainage holes
- Place saucers underneath to catch excess water
Best Container Varieties
- Sugar Baby: 8–10 lbs, 75–80 days, perfect for containers
- Icebox: 5–15 lbs, 70–75 days, compact growth
- Yellow Doll: 6–8 lbs, 65–70 days, fast-maturing
- Minilove: 3–4 lbs, 60–65 days, ultra-compact
Container Growing Tips
Watering:
- Containers dry out faster than ground soil
- Water when the top inch of soil is dry (usually daily in summer)
- Water until water drains from the bottom
Fertilizing:
- Nutrients leach from containers faster
- Fertilize every 2 weeks (vs. every 3–4 weeks for ground growing)
- Use liquid fertilizer for easier application
Support:
- Trellis vines vertically using stakes, cages, or strings
- Use slings (old pantyhose) to support fruit
- Vertical growing saves space and improves air circulation
Pollination:
- Place containers in high-traffic areas where pollinators visit
- Hand-pollinate if few bees visit your patio
- See the “Pollination” section for instructions
Yield expectations:
- 1–2 melons per plant (vs. 3–5 for ground growing)
- Smaller fruit than ground-grown melons
- Still delicious and rewarding
Companion Plants for Watermelons
Watermelons grow well with most plants, but some combinations are better than others.
Best Companion Plants (& Why)
Beans & Peas:
- Fix nitrogen in soil (watermelons are heavy feeders)
- Plant at the same time as watermelons
- Plant in rows between watermelon plants
Onions & Garlic:
- Repel squash bugs and cucumber beetles
- Plant around the perimeter of your watermelon patch
- Harvest after the watermelons are done
Radishes:
- Act as a “trap crop” for beetles
- Beetles prefer radishes over watermelons
- Plant radishes 2 weeks before watermelons
- Plant radishes around the watermelon patch border
Lettuce & Spinach:
- Grow in the shade of watermelon vines
- Extend harvest season
- Plant in early spring before vines get large
Herbs (Basil, Oregano, Thyme):
- Attract pollinators
- Repel some pests
- Plant nearby (not directly under vines)
Plants to AVOID
Cucumbers, Zucchini, Other Melons:
- Compete for water and nutrients
- Attract the same pests and diseases
- Can cross-pollinate (if growing multiple melon types)
Potatoes:
- Attract similar diseases
- Compete for space and nutrients
- Can harbor pests that affect watermelons
Fennel:
- Inhibits the growth of most plants
- Don’t plant anywhere near watermelons
Nutritional Value & Health Benefits
Watermelons are more than just refreshing—they’re nutritious.
Nutritional Breakdown (Per 1 Cup / 152g)
| Nutrient | Amount | % Daily Value |
| Water | 138g | 92% |
| Calories | 46 | 2% |
| Carbohydrates | 11.5g | 4% |
| Fiber | 0.6g | 2% |
| Protein | 0.9g | 2% |
| Fat | 0.2g | 0% |
| Vitamin A | 569 IU | 11% |
| Vitamin C | 8.1mg | 14% |
| Vitamin B6 | 0.1mg | 5% |
| Potassium | 170mg | 5% |
Key Health Benefits
Lycopene (antioxidant):
- Gives watermelon its red color
- Linked to heart health and cancer prevention
- Increases as watermelon ripens
Citrulline (amino acid):
- Improves blood flow
- May help with muscle soreness
- Body converts citrulline to arginine
Hydration:
- 92% water
- Electrolytes (potassium, magnesium)
- Perfect post-workout snack
Troubleshooting: My Watermelon Plant Looks Sick
Leaves Are Wilting But Soil Is Wet
Likely cause: Fungal disease (powdery mildew, anthracnose, or root rot)
What to do:
- Remove affected leaves immediately
- Improve air circulation (space plants properly, prune lower leaves)
- Water only at soil level (never wet leaves)
- Spray with sulfur fungicide (follow label directions)
- Reduce watering frequency
Leaves Are Wilting and Soil Is Dry
Likely cause: Underwatering or squash vine borers
What to do:
- Check vine base for small holes and sawdust (sign of borers)
- If borers found: Inject BT pesticide into stem or remove affected section
- If dry: Water immediately and increase watering frequency to 1–2 inches per week
- Add mulch to retain moisture
Yellow Spots on Leaves
Likely cause: Bacterial wilt (spread by striped cucumber beetles)
What to do:
- No cure exists; remove plant to prevent spread
- Plant resistant varieties next year (Crimson Sweet, Picnic)
- Use row covers on young plants next season
- Control beetle population with neem oil or spinosad
Plant Is All Leaves, No Flowers (Week 6+)
Likely cause: Too much nitrogen
What to do:
- Stop fertilizing with nitrogen-rich fertilizer
- Switch to phosphorus and potassium-rich fertilizer
- Prune some leaves to redirect energy to flowering
- Be patient; flowers should appear within 1–2 weeks
Small Holes in Leaves, Wilting
Likely cause: Squash bugs or striped cucumber beetles
What to do:
- Hand-pick insects into soapy water (check daily)
- Check leaf undersides for egg clusters and remove
- Spray neem oil or insecticidal soap weekly
- Plant radishes as a trap crop
Fruit Stays Small & Green (Week 10+)
Likely cause: Poor pollination, too much nitrogen, or insufficient water
What to do:
- Ensure pollinators have access (remove row covers if still on)
- Hand-pollinate female flowers (see “Pollination” section)
- Reduce nitrogen fertilizer
- Maintain consistent watering (1–2 inches per week)
Growing Watermelons in Different US Climates
Hot & Dry Climates (Southwest: AZ, NV, UT, CA)
Advantages:
- Long growing season (120+ frost-free days)
- Abundant sunshine
- Low disease pressure
Challenges:
- Extreme heat can stress plants
- Dry air increases pest pressure
- Soil may be alkaline (high pH)
Tips:
- Choose heat-tolerant varieties (Picnic types, Crimson Sweet)
- Mulch heavily to retain moisture
- Test soil pH; add sulfur if pH is above 7.0
- Provide afternoon shade in extreme heat (>105°F)
- Water deeply and frequently (may need daily watering in peak summer)
Warm & Humid Climates (South: TX, FL, GA, LA)
Advantages:
- Long growing season (120+ frost-free days)
- Warm soil
- Natural pollinators
Challenges:
- High humidity increases fungal disease risk
- Heavy rainfall can cause overwatering
- Pests thrive in warm, wet conditions
Tips:
- Choose disease-resistant varieties (Crimson Sweet, Sugar Baby)
- Space plants far apart for air circulation
- Water at soil level only (never wet leaves)
- Spray preventative fungicide weekly
- Use row covers to protect from pests
- Plant in spring and late summer for two harvests
Moderate Climates (Midwest: IL, OH, MI, WI)
Advantages:
- Good rainfall
- Moderate temperatures
- Manageable pest pressure
Challenges:
- Short growing season (80–100 frost-free days)
- Cool springs delay planting
- Early fall frost can cut season short
Tips:
- Start seeds indoors 6–8 weeks before last frost
- Use black plastic mulch to warm soil
- Choose fast-maturing varieties (Icebox, Sugar Baby, 70–80 day varieties)
- Plant as soon as soil reaches 70°F
- Consider row covers to extend season into fall
Cool & Short Seasons (Northeast: NY, PA, MA, VT)
Advantages:
- Cool nights produce sweet fruit
- Lower pest pressure
- Abundant rainfall
Challenges:
- Very short growing season (60–80 frost-free days)
- Cool springs delay planting
- Early fall frost cuts season short
Tips:
- Start seeds indoors 8–10 weeks before last frost
- Use black plastic mulch to warm soil
- Use row covers and cold frames to extend season
- Choose ultra-fast-maturing varieties (Sugar Baby 75–80 days, Yellow Doll 65–70 days)
- Consider growing in containers (easier to move indoors if frost threatens)
- Plant transplants (not seeds) for highest success rate
Pacific Northwest (WA, OR)
Advantages:
- Cool nights produce sweet fruit
- Low pest pressure
- Abundant rainfall
Challenges:
- Cool, wet springs
- Short growing season (70–90 frost-free days)
- Cloudy summers reduce sunlight
Tips:
- Start seeds indoors 8–10 weeks before last frost
- Use black plastic mulch to warm soil aggressively
- Choose fast-maturing varieties (Icebox, Sugar Baby)
- Plant in warmest, sunniest location
- Use row covers to extend season
- Consider growing in containers (easier to move to sunny spots)
Tips & Tricks for Growing Watermelons
Can Watermelon Plants Survive Winter?
No. Watermelons are warm-season crops and cannot survive frost.
Critical temperatures:
- Below 50°F: Growth slows dramatically
- Below 33°F: Plant dies
- Frost kills plants instantly
For cool climates:
- Plant seeds indoors in late winter (6–8 weeks before last frost)
- Transplant outdoors after last frost date
- Use black plastic mulch and row covers to extend season
- Choose fast-maturing varieties
- Plant as early as possible to maximize growing season
For warm climates:
- In winter, maintain warm soil temperatures (use black plastic, row covers, or cold frames)
- Some gardeners grow watermelons year-round in southern Florida and southern Texas
Extending Your Growing Season
Start early:
- Begin seeds indoors 6–8 weeks before last frost
- Transplant as soon as soil reaches 70°F
- Every week earlier = earlier harvest
Use season extenders:
- Black plastic mulch warms soil
- Row covers protect from frost and pests
- Cold frames extend season on both ends
Choose fast-maturing varieties:
- Sugar Baby: 75–80 days
- Yellow Doll: 65–70 days
- Icebox types: 70–75 days
Plan for fall harvest:
- In warm climates, plant a second crop in mid-summer for fall harvest
- In cool climates, plant early-maturing varieties in late spring for early fall harvest
Maximizing Sweetness
Dry weather produces the sweetest melons:
- Reduce watering in weeks 9+ (fruit development phase)
- Stop watering 1–2 weeks before harvest
- Dry stress concentrates sugars
Proper fertilizing:
- Avoid excess nitrogen (causes leafy growth, not sweetness)
- Use phosphorus and potassium-rich fertilizer during fruit development
- Seaweed extract boosts sweetness
Harvest at peak ripeness:
- Don’t harvest early
- Use the thump test and other ripeness indicators
- Ripe watermelons are sweeter than underripe ones
Storing Watermelons
Whole watermelons:
- Room temperature: 2–3 weeks
- Refrigerator: 3–4 weeks
- Don’t store below 50°F (cold damages flavor)
Cut watermelons:
- Refrigerator: 3–5 days in an airtight container
- Wrap tightly to prevent drying

Conclusion: Start Growing Your Own Watermelons Today
Growing watermelons is one of the most rewarding gardening projects you can undertake. With proper planning, consistent care, and attention to detail, you’ll harvest delicious, homegrown watermelons that taste infinitely better than store-bought varieties.
Your Action Plan
This week:
- Determine your last frost date (planthardiness.ars.usda.gov)
- Assess your growing space (sunlight, drainage, space)
- Choose a watermelon variety (Sugar Baby for beginners)
- Test your soil pH and nutrients (optional but recommended)
Next week:
- Buy seeds or transplants
- Prepare your soil with compost and amendments
- Set up watering system (drip irrigation or soaker hose)
- Plant seeds or transplants
Following weeks:
- Water consistently (1–2 inches per week)
- Fertilize every 2–3 weeks
- Monitor for pests and diseases
- Hand-pollinate if needed
In 80–90 days:
- Harvest ripe watermelons
- Enjoy the sweetest fruit you’ve ever tasted
- Save seeds for next year (if growing open-pollinated varieties)
Final Thoughts
Whether you have a large backyard, a small patio, or just a sunny balcony, there’s always a way to grow watermelons. Start with one plant this season. Learn what works in your specific climate and garden. Next year, expand and experiment with new varieties.
Growing food from seed to harvest is deeply satisfying. You’ll taste the difference between homegrown and store-bought. You’ll understand why farmers wake up at dawn. And you’ll join a community of gardeners who’ve discovered one of life’s simple pleasures: biting into a perfectly ripe, homegrown watermelon on a hot summer day.
So go ahead—plant your watermelons today. You won’t regret it.
Amazon and the Amazon logo are trademarks of Amazon.com, Inc, or its affiliates.

Gardener with 12+ years of hands-on experience growing vegetables and fruits in home gardens. Learned through trial, error, and observation — not textbooks. Shares what actually works (and what doesn’t) in real-world conditions. No fluff, no hype — just practical tips from the soil up.