We use affiliate links to run our site. When you buy through links on our site, we may earn an affiliate commission, without any added cost to you. Learn more
Elephant Ear plants are the rock stars of the foliage world. With leaves as big as dinner plates and a presence that demands attention, they turn a drab corner into a tropical jungle overnight. But here’s the real kicker: you don’t need to buy more plants. You can clone your existing giants for free.
Sounds too good to be true? Well, It’s not. Propagating elephant ears is like having a garden magic trick up your sleeve. Whether you want to fill a shady corner, gift a friend, or just see the magic of life cycle play out in your pots, this guide is your backstage pass.
We’re going to ditch the boring textbook jargon and get our hands dirty. I’ll walk you through the three best methods, the perfect timing, and the one safety rule you absolutely cannot ignore.
Ready to multiply your green army? Let’s dive in.
Best time for propagation
You might be tempted to try this in the dead of winter or the scorching heat of August. I get it; gardening doesn’t always wait for the calendar. But if you want your baby plants to thrive, not just survive, spring is your best friend.
Think of your elephant ear plant like a bear waking up from hibernation. In winter, it’s dormant, sleeping tight. In spring, it’s stretching its legs, full of energy, and ready to grow. When you divide or plant during this window, the plant’s natural hormones are screaming, “Let’s grow!”
Why wait?
- Faster Root Growth: The soil is warming up, and the days are getting longer. This triggers rapid root development.
- Lower Stress: The plant is naturally active, so it recovers from the “surgery” of division much faster.
- More Time to Establish: Planting in spring gives the new babies months to get strong before the next winter hits.
Sure, you can do it indoors in winter under grow lights, but why fight the current when you can ride the wave?
Safety First: The “Ouch” Factor
Before we grab our trowels, we need to have a serious chat about safety. Elephant Ears (both Colocasia and Alocasia) are beautiful, but they have a secret weapon.
Warning: Every part of the plant contains calcium oxalate crystals.
What does that mean? If you touch the sap and then rub your eyes, or if a curious pet chews on a leaf, it’s going to sting like crazy. It’s nature’s way of saying, “Don’t eat me!”
The Golden Rule: Always wear heavy-duty gloves and long sleeves when handling the tubers or cutting the plant. Wash your hands thoroughly afterward. It’s a small hassle for a huge payoff in safety.
How to Propagate Elephant Ears Plants?
There are mainly three ways to propagate an elephant ear plant:
- Propagation through tubers
- Propagation through seeds
- Propagation through suckers
Method 1: The Tuber Division (The Gold Standard)
This is the most common way to propagate elephant ears. It’s like splitting a potato to plant more potatoes, but fancier. It’s reliable, fast, and gives you instant results.
When to Dig?
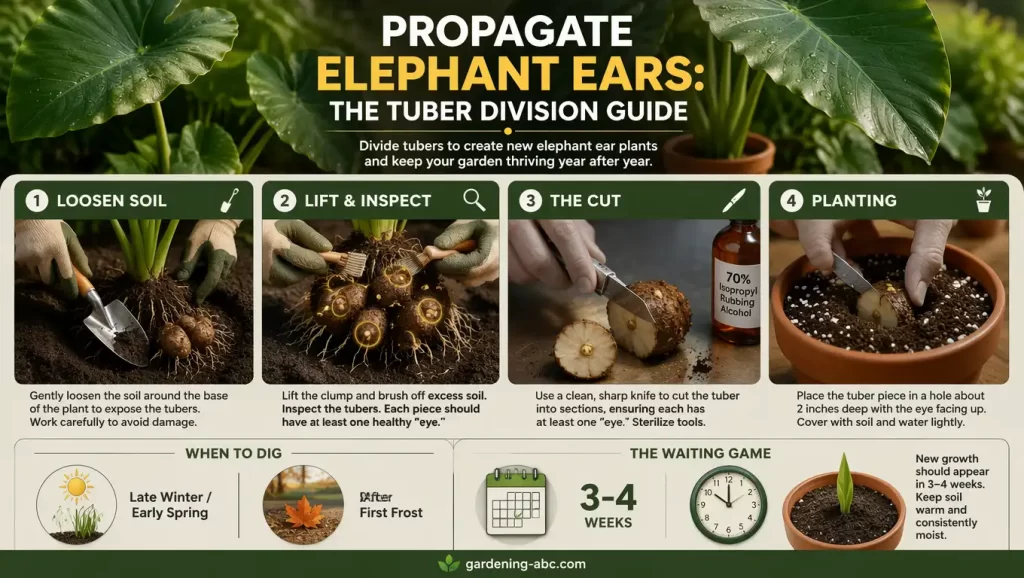
The best time is late winter or early spring, just as the plant is waking up but before the big leaves explode out of the ground. If you missed that window, you can do it right after the first frost in the fall when the plant goes dormant.
Step-by-Step Guide
- Loosen the Soil: Grab your shovel and gently dig around the base of the plant. You’re looking for the main cluster of tubers (the bulbs). Don’t yank! Treat the roots like they’re made of glass.
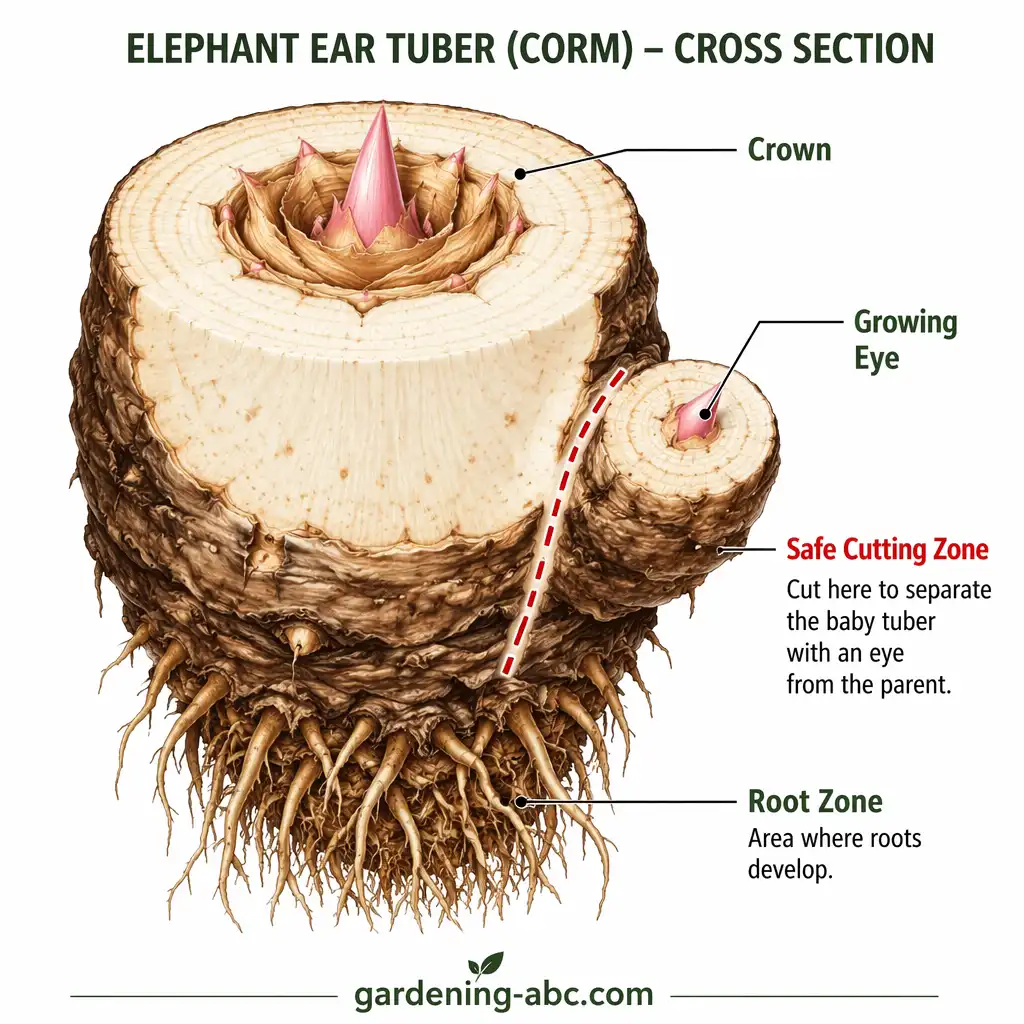
- Lift and Inspect: Lift the whole clump out of the soil. Brush off the excess dirt so you can see what you’re working with. Look for the “eyes”—those little bumps that look like potato eyes. That’s where the new growth is coming from.
- The Cut: You need a sharp, sterilized knife. Wipe it with rubbing alcohol to prevent infection. Look for tubers attached to the main clump that have at least one or two eyes.
- Pro Tip: Make sure you leave at least one large, healthy tuber attached to the parent plant so it can be replanted and keep growing.
- Separate: Slice through the connecting tissue. You want a clean cut. If a tuber has no eyes, it won’t grow. Discard those or compost them (they won’t sprout).
- Planting: Fill a pot with high-quality, well-draining potting mix. Dig a hole about 2 inches deep. Place the tuber inside with the eye facing up. Cover it gently with soil.
- The Waiting Game: Water it lightly. Keep the pot in a warm, shady spot. No direct sun yet! In about 3 to 4 weeks, you should see a little green spear poking out. That’s your victory lap.
Think of this like splitting a savings account. You take a chunk of the principal (the tuber) and put it into a new account (the new pot). As long as the new account has money (energy) in it, it will grow.
How to Grow Alocasia from a Bulb
Method 2: Growing from Seeds (The Patience Game)
Want a challenge? Try growing from seeds. This method is less common because elephant ears don’t flower often in cultivation, and when they do, they need help. But if you love a long-term project, this is for you.
The Pollination Hustle
Elephant ears produce flowers that look like Calla Lilies—a white, yellow, or orange central spike (the spadix) surrounded by a hood.
- The Problem: They don’t pollinate themselves easily.
- The Fix: You need to play matchmaker. When the flowers open, take a clean cotton swab. Gently dip it in the pollen from one flower and brush it onto the stigma of another. Do this early in the morning.

From Flower to Berry
If you’re lucky, the flower will fade, and a green or yellowish berry will form.
- Harvest: Wait until the berry turns soft.
- Extract: Squeeze the berry to get the seeds. Rinse them to remove the pulp.
- Planting: Spread the seeds on the surface of moist soil. Don’t bury them deep; they need light to germinate.
- Moisture is Key: Mist them daily. Keep the soil damp but not soggy.
- Germination: In about 21 days, you’ll see tiny sprouts.
- Transplant: Once they have a few leaves and look sturdy, move them to larger containers.
Is it worth it? It takes longer, and you might get some surprise varieties (since seeds mix genetics). It’s like opening a mystery box of plants!
Method 3: The Sucker Method (The Slow and Steady)
Have you ever noticed little baby plants popping up around the base of your main elephant ear? Those are suckers (or offsets). They are essentially clones of the mother plant.
This method is the easiest but the slowest. You’re not cutting anything; you’re just moving a baby to its own room.
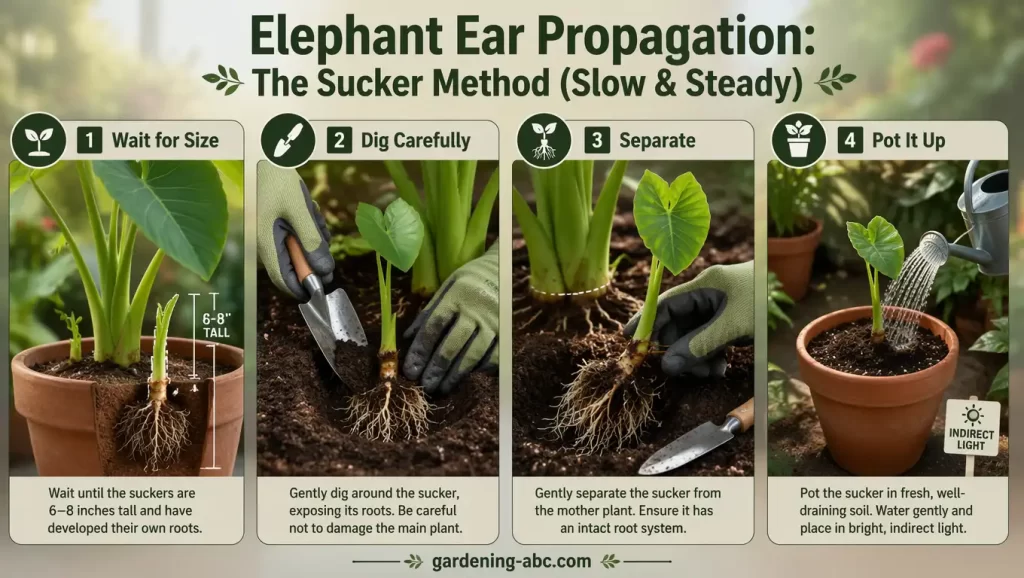
- Wait for Size: Don’t pull a tiny nub off. Wait until the sucker is at least 6-8 inches tall and has developed its own small root system.
- Dig Carefully: Gently dig around the base of the sucker, keeping as many roots attached as possible.
- Separate: Use your hands or a trowel to gently separate the sucker from the mother plant’s root ball. If it’s stuck, a clean cut might be necessary.
- Pot It Up: Plant the sucker in a pot with fresh soil. Water it well and keep it in indirect light for a week to let it settle.
This is a great way to get new plants without “hurting” the mother plant too much, as you’re just harvesting the extras.
Which elephant ear is best for you
Troubleshooting: Why Are My Elephant Ears Turning Yellow?
You’ve done the work, you’ve planted the tuber, and suddenly… yellow leaves. Panic mode? Not yet.
Yellow leaves are the plant’s way of sending a text message. Here’s what it’s trying to say:
- Overwatering: The most common culprit. Elephant ears like moisture, but they hate sitting in a swamp. If the soil is soggy, the roots rot. Fix: Let the top inch of soil dry out before watering again.
- Underwatering: If the soil is bone dry, the plant sacrifices leaves to save water. Fix: Water more frequently, especially in hot weather.
- Nutrient Deficiency: Is your soil starving? Fix: Add a balanced, slow-release fertilizer in the spring.
- Natural Aging: Sometimes, the oldest leaf at the bottom turns yellow and dies. This is normal. Just snip it off.
Read the full guide: Why are my elephant ears turning yellow?
Can You Propagate Elephant Ears in Water?
Yes! Specifically, the Colocasia species (often called Taro) loves water. In fact, they naturally grow in swamps and marshes.
- How to do it: Take a healthy tuber or a sucker with roots and place it in a jar of water. You can submerge the tuber completely or just the roots.
- Maintenance: Change the water every few days to keep it oxygenated and prevent algae.
- The Catch: Plants grown in water often produce smaller leaves than those grown in soil. But for a cool indoor display, it’s a fantastic option.
Can You Propagate from a Single Leaf Cutting?
Let’s bust a myth right now. No, you cannot grow an elephant ear from a single leaf cutting.
Unlike a Pothos or a Peperomia, elephant ears don’t have the magic ability to regenerate a whole new plant from a leaf fragment. The leaf lacks the “crown” or the meristematic tissue needed to create roots and a new stem. You need the tuber or the corm (the central bulb). If you try to put a leaf in water, you’ll just get a rotting leaf. Save your time and stick to the tuber methods!
Conclusion
Propagating elephant ears is one of the most rewarding tasks in the garden. It’s free, it’s fun, and the satisfaction of seeing a tiny sprout turn into a jungle giant is unmatched. Whether you choose the speed of tuber division, the patience of seeds, or the gentle approach of suckers, you’re bound to succeed if you follow the basics: plant in spring, keep the soil moist, and wear your gloves.
Don’t be afraid to experiment. Gardening is a process of trial and error. Even if you lose a tuber or two, you’re learning. And remember, every time you divide a plant, you’re not just making more plants; you’re spreading a little bit of nature’s magic to your friends and family. So grab your trowel, put on those gloves, and let’s get growing!
Frequently Asked Questions(FAQs):
-
How deep should I plant my elephant ear tubers?
A good rule of thumb is to plant the tuber about 2 to 4 inches deep. If you’re planting in a pot, make sure the top of the tuber is just barely covered or level with the soil surface. Planting too deep can delay sprouting or cause rot; planting too shallow can expose the tuber to drying out.
-
Do elephant ears need direct sunlight to grow?
It depends on the variety! Alocasia species generally prefer bright, indirect light and can scorch in harsh direct sun. Colocasia species (like the classic Taro) are tougher and can handle morning sun but prefer shade during the intense afternoon heat. Too much direct sun will turn those beautiful green leaves crispy and brown.
-
How often should I water my newly propagated elephant ears?
New plants need consistent moisture but not saturation. Check the top inch of soil daily. If it feels dry, water it. If it feels soggy, wait. The goal is to keep the soil like a wrung-out sponge—damp to the touch but not dripping. Overwatering is the number one killer of new tubers.
-
Can I save elephant ear tubers for next year?
Absolutely! In colder climates (where frost kills the plant), you can dig up the tubers in the fall after the first frost has blackened the leaves. Let them dry for a day, brush off the soil, and store them in a cool, dry place (like a basement) in a bag of peat moss or vermiculite. Check them occasionally to ensure they aren’t rotting or drying out.
-
Why did my elephant ear tuber rot after planting?
Rot is usually caused by fungus or bacteria thriving in wet, cold, or oxygen-starved soil. If you plant too early when the soil is freezing, or if your pot has no drainage holes, the tuber will rot before it can sprout. Ensure your soil is well-draining and warm (above 65°F or 18°C) before planting.
Amazon and the Amazon logo are trademarks of Amazon.com, Inc, or its affiliates.

Gardener with 12+ years of hands-on experience growing vegetables and fruits in home gardens. Learned through trial, error, and observation — not textbooks. Shares what actually works (and what doesn’t) in real-world conditions. No fluff, no hype — just practical tips from the soil up.