We use affiliate links to run our site. When you buy through links on our site, we may earn an affiliate commission, without any added cost to you. Learn more
Roses are renowned for their beauty and fragrance, and many gardening enthusiasts are eager to propagate these stunning flowers to expand their collections.
Propagation allows you to create new rose plants from existing ones, giving you the opportunity to enjoy more blooms in your garden.
In this article, we will guide you through the process of propagating roses, providing step-by-step instructions and valuable tips to ensure successful results.
Table of Contents
What is Rose Propagation
Rose propagation refers to the process of creating new rose plants from existing ones. There are several methods of propagation, including stem cuttings, layering, and grafting.
Each method has its own advantages and is suitable for different situations. By understanding these methods, you can choose the one that best suits your needs.
How to Propagate Roses:
There are three primary methods of propagating roses: stem cuttings, layering, and grafting. Let’s explore each method in detail:
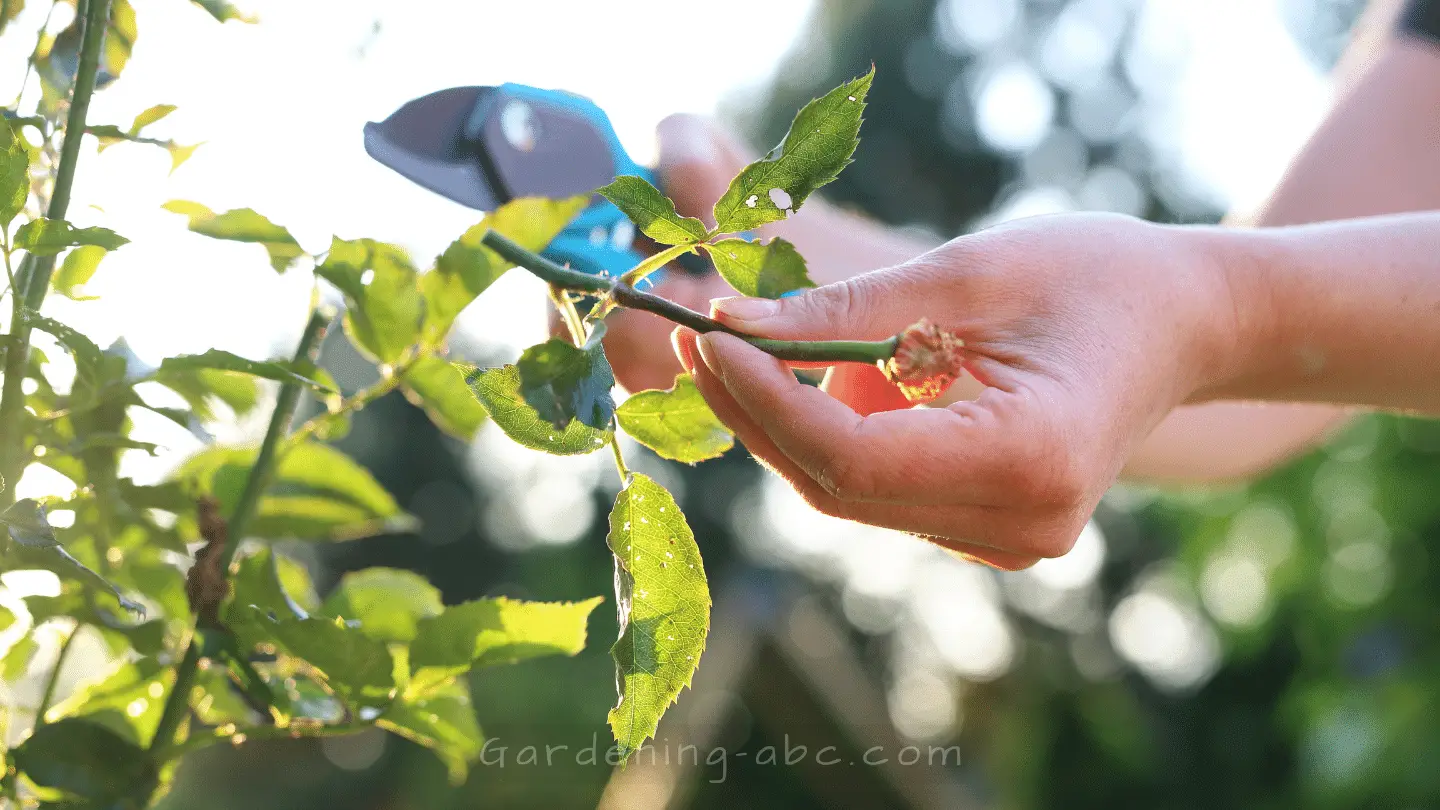
1. Stem Cuttings
Stem cuttings involve taking a section of a rose stem and encouraging it to grow roots. This method is popular due to its simplicity and high success rate. It is commonly used for propagating hybrid tea roses, floribundas, and miniature roses.
2. Layering
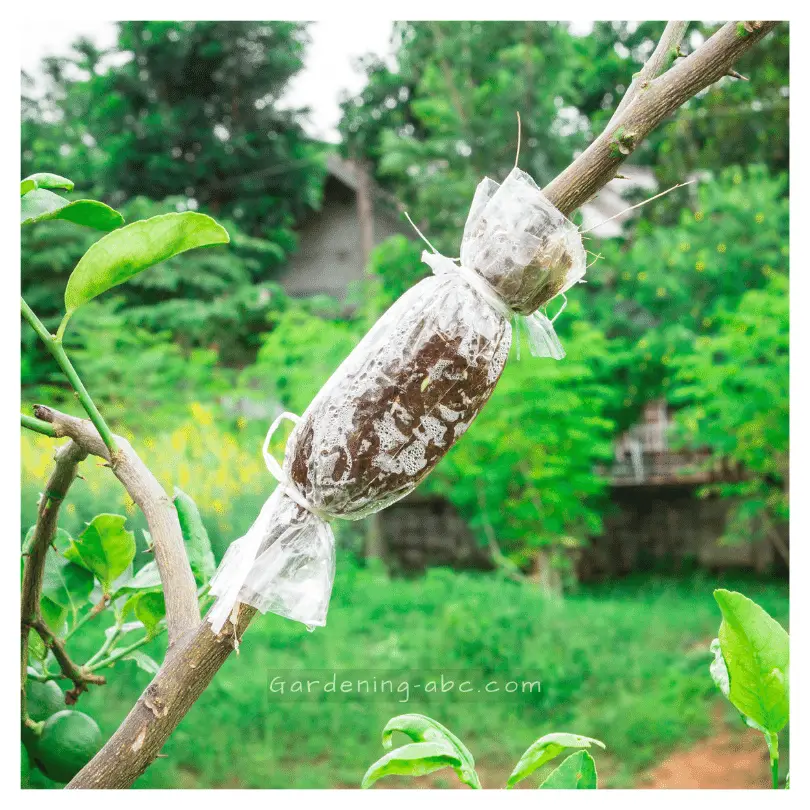
Layering is a technique where a portion of a rose stem is bent and buried in the soil while still attached to the parent plant. The buried section will develop roots, and once it establishes itself, it can be separated from the parent plant. Layering is often used for climbing roses and shrub roses.
3. Grafting
Grafting involves joining a section of a rose plant, known as the scion, onto the rootstock of a different rose plant. This method is commonly used for propagating hybrid teas, grandifloras, and other grafted roses.
Grafting allows you to maintain the desired characteristics of the scion while benefiting from the disease resistance and vigor of the rootstock.
Preparing for Propagation
Before you begin the propagation process, it’s essential to gather the necessary tools and prepare your materials.
Here’s what you’ll need:
- Pruning shears
- A clean and sharp knife
- Rooting hormone (optional)
- Potting mix
- Containers or pots
- Clear plastic bags or propagating domes
- Watering can or spray bottle
- Labels for identification
Ensure that your pruning shears and knife are clean and sharp to make clean cuts, which will aid in the success of your propagation efforts. Additionally, prepare your potting mix, which should be well-draining and suitable for growing roses.
Propagation Process
Now that you’re ready to propagate roses, let’s delve into the step-by-step process for each method:
Stem Cuttings Method
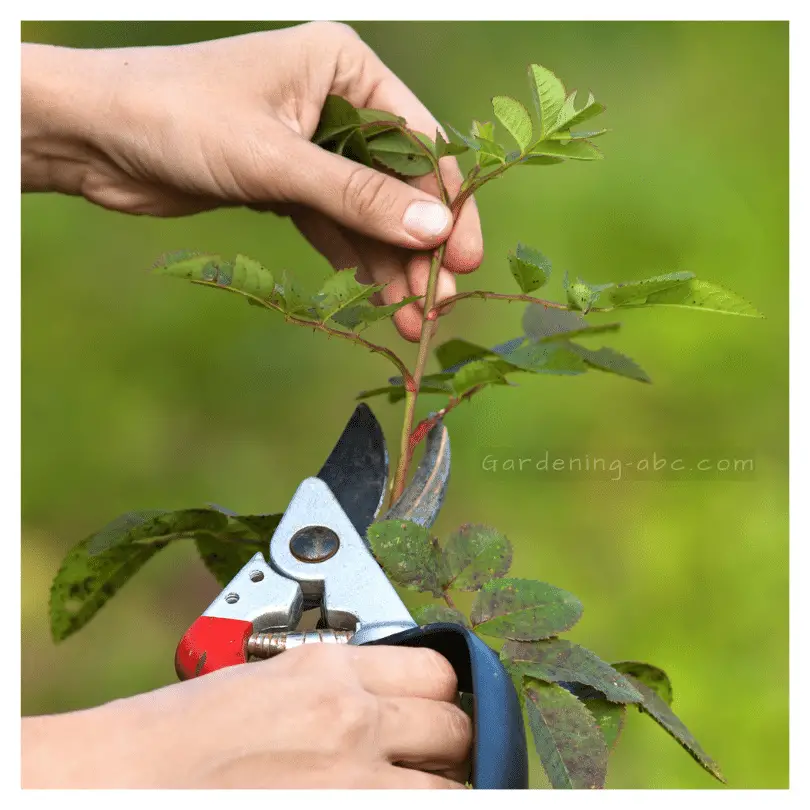
- Select a healthy stem from the parent plant that is about 6-8 inches long and has a few sets of leaves.
- Make a clean, diagonal cut just below a set of leaves at the base of the stem.
- Remove any flowers or buds to redirect the plant’s energy towards root development.
- Optionally, dip the cut end of the stem into rooting hormone to enhance root growth.
- Fill a container with potting mix and create a hole using a pencil or your finger.
- Insert the bottom end of the stem into the hole, ensuring at least two sets of leaves are above the soil.
- Gently press the soil around the stem to secure it in place.
- Place a clear plastic bag or propagating dome over the container to create a humid environment.
- Position the container in a warm and bright location, but away from direct sunlight.
- Mist the leaves with water regularly to maintain moisture levels.
- After 6-8 weeks, check for root growth by gently tugging the stem. If resistance is felt, roots have formed.
- Gradually acclimate the newly rooted rose to outdoor conditions before transplanting it to a larger pot or garden bed.
Layering Method
- Identify a low-growing, flexible stem on the parent plant that can be bent towards the ground.
- Remove any thorns along the buried section of the stem.
- Create a small trench in the soil near the parent plant.
- Gently bend the selected stem into the trench and bury it, leaving the tip exposed.
- Secure the stem in place with a U-shaped wire or a small rock.
- Cover the buried portion of the stem with soil, leaving the tip exposed.
- Water the area thoroughly to ensure good soil contact and moisture.
- Maintain regular watering, keeping the soil moist but not waterlogged.
- After several months, check for root development by gently tugging the buried stem. If resistance is felt, roots have formed.
- Once the new plant is established, carefully sever it from the parent plant and transplant it to its desired location.
Grafting Method
- Select a healthy scion from the desired rose variety and a compatible rootstock plant.
- Make a slanted cut at the base of the scion and a corresponding cut on the rootstock.
- Join the two cuts together, ensuring the cambium layers of both scion and rootstock are aligned.
- Secure the union with grafting tape or rubber bands.
- Cover the grafted area with grafting wax or grafting compound to protect it from infection.
- Place the grafted plant in a warm and humid environment, such as a greenhouse.
- Monitor the plant closely for signs of successful grafting, such as new growth.
- After several weeks, gradually expose the grafted plant to outdoor conditions and reduce the humidity.
- Once the grafted plant shows vigorous growth and has established itself, it can be transplanted to its permanent location in the garden.
Caring for Newly Propagated Roses
After successfully propagating roses, it’s important to provide proper care to ensure their healthy growth. Here are some essential care tips for newly propagated roses:
1. Place the newly propagated roses in a location with partial shade to protect them from intense sunlight.
Newly propagated roses have delicate root systems that are still establishing themselves. Placing them in an area with partial shade helps protect them from the harsh rays of the sun, which can cause stress or sunburn.
It allows the plants to gradually acclimate to sunlight while providing a more suitable environment for their initial growth.
2. Keep the soil consistently moist but not waterlogged.
Proper moisture is crucial for the successful establishment of newly propagated roses. Aim to keep the soil consistently moist by watering them regularly. However, be cautious not to overwater, as waterlogged soil can lead to root rot and other issues.
Strike a balance by ensuring the soil remains damp but not saturated, promoting healthy root development.
3. Mulch around the base of the plants to retain moisture and suppress weed growth.
Mulching is beneficial for newly propagated roses in several ways. By applying a layer of organic mulch, such as wood chips or compost, around the base of the plants, you create a barrier that helps retain soil moisture, preventing it from drying out too quickly.
Additionally, mulch acts as a natural weed suppressor, reducing competition for resources and nutrients.
4. Regularly monitor for pests and diseases and take appropriate measures.
Vigilance in pest and disease control is essential for the well-being of newly propagated roses. Regularly inspect the plants for any signs of pests like aphids, spider mites, or fungal diseases such as powdery mildew or black spot.
If detected, take appropriate measures promptly, such as using organic insecticides or fungicides, to prevent further damage and maintain the health of the plants.
5. Provide support, such as stakes or trellises, for climbing roses.
If you’ve propagated climbing rose varieties, it’s crucial to provide proper support for their vertical growth. Install stakes or trellises near the plants to give them a structure to climb on.
This support helps prevent the canes from drooping or sprawling on the ground, promoting better air circulation, reducing the risk of disease, and allowing the roses to showcase their climbing nature.
6. Prune to encourage branching and promote a bushy growth habit:
Pruning plays a vital role in shaping the growth of newly propagated roses. By selectively removing certain stems or branches, you encourage the plant to channel its energy into producing new growth and branching out.
This promotes a bushier and more compact growth habit, resulting in a fuller and more visually appealing plant. Pruning also helps remove any weak or damaged branches and stimulates the production of new blooms.
Remember to approach pruning with care and use clean, sharp pruning shears to make precise cuts. It’s best to prune during the dormant season or after the initial flowering period to avoid disrupting the growth cycle of the roses.
[su_note note_color=”#ecece2″ radius=”1″]A detailed guide on how to grow roses effortlessly [/su_note]
Common Mistakes to Avoid
While propagating roses, it’s important to be aware of common mistakes and avoid them to maximize your success rate. Here are a few mistakes to steer clear of:
1. Using unhealthy or weak parent plants for propagation:
The success of rose propagation heavily relies on the health and vigor of the parent plants. Selecting unhealthy or weak plants as the source for cuttings or scions can result in poor-quality propagated plants.
It’s crucial to choose parent plants that exhibit robust growth, have no signs of diseases or pest infestations, and display desirable characteristics that you want to replicate in the new plants.
2. Taking cuttings from diseased or pest-infested plants:
Propagating roses from cuttings taken from diseased or pest-infested plants can introduce those issues to the newly propagated plants. It’s important to ensure that the parent plants are free from any visible signs of diseases, such as discolored leaves, spots, or wilting.
Similarly, inspect the plants for common rose pests like aphids, thrips, or spider mites. Taking cuttings from healthy, pest-free plants increases the chances of success and reduces the risk of spreading problems to new plants.
3. Failing to provide adequate moisture and humidity during the rooting process:
Rooting is a critical stage in rose propagation, and maintaining the right moisture and humidity levels is crucial for successful root development. Neglecting to provide adequate moisture can lead to desiccation and failure to root.
Also, ensure that the rooting medium, such as a well-draining potting mix, remains consistently moist but not waterlogged.
Additionally, maintaining higher humidity levels around the cuttings, such as by using a propagation dome or misting, can promote successful rooting.
4. Overlooking proper sterilization of tools, leading to potential infections:
When taking cuttings or performing grafting, it’s essential to use clean and sterilized tools to prevent the transmission of diseases or infections.
Neglecting proper sterilization of tools can introduce harmful pathogens to the cuttings or scions, increasing the risk of failure or the development of diseases.
Before each use, sterilize your tools by wiping them with rubbing alcohol or a diluted bleach solution to ensure a clean and safe propagation process.
5. Neglecting to label and identify the propagated plants, causing confusion later on:
Proper labeling and identification of propagated plants are essential to keep track of their characteristics, parentage, and specific care requirements. Neglecting to label and identify the propagated plants can lead to confusion, especially when you have multiple varieties or experimental propagation projects.
Use labels or tags with clear and accurate information, including the name of the variety, date of propagation, and any other relevant details.
This will help you stay organized and make informed decisions regarding their care and placement in your garden.
By avoiding these common mistakes when propagating roses, you increase the chances of success and ensure that your newly propagated plants are healthy, robust, and free from potential problems.
Taking the necessary precautions and following best practices will contribute to the overall success and satisfaction of your rose propagation endeavors.
[su_note note_color=”#ecece2″ radius=”1″]10 best Fertilizers for roses that are FULLY ORGANIC!!![/su_note]
Troubleshooting Tips
If you encounter challenges during the rose propagation process, here are some troubleshooting tips to help you overcome them:
1. The cuttings fail to root:
When propagating roses from stem cuttings, the rooting process is a critical stage. If the cuttings fail to root, it could be due to improper moisture levels in the rooting medium. Check the soil moisture by gently poking a finger into the soil around the cuttings.
If it feels excessively wet or waterlogged, it may hinder root development. On the other hand, if the soil feels dry, the cuttings may not be receiving enough moisture.
Adjust the watering accordingly by either reducing the frequency of watering or ensuring the soil remains consistently moist but not overly saturated.
2. If the newly propagated roses show signs of wilting:
Wilting in newly propagated roses can be an indication of water stress. Ensure that the plants are receiving sufficient water by regularly monitoring the moisture levels in the soil. If the soil feels dry, increase the frequency of watering to provide adequate moisture.
Additionally, wilting can also occur due to excessive sun exposure. If the propagated roses are exposed to intense sunlight, provide temporary shade using a shade cloth or by placing them in a partially shaded area. This will help reduce stress on the plants and promote their recovery.
3. Grafting is not working:
Grafting is a technique used to propagate roses, especially for specific varieties or to maintain certain characteristics. If the grafting process fails, it’s important to evaluate the compatibility between the scion (the desired rose variety) and the rootstock (the base onto which the scion is grafted).
Certain rose varieties and rootstocks have better compatibility than others. If the initial grafting attempt fails, double-check if the chosen scion and rootstock are suitable matches. If not, consider regrafting with a better match to increase the chances of success.
When troubleshooting issues during rose propagation, it’s crucial to carefully observe the plants, assess their growing conditions, and make the necessary adjustments.
By addressing these issues and taking appropriate corrective measures, you can increase the likelihood of achieving successful results in propagating roses.
Frequently Asked Questions(FAQs):
Can all rose varieties be propagated using the same method?
No, different rose varieties may require specific propagation methods. Stem cuttings are the most versatile method, but certain roses, such as climbers, may respond better to layering.
When is the best time to propagate roses?
The ideal time for rose propagation depends on the method. Stem cuttings are typically taken in late spring or early summer, while layering is best done in early spring or autumn. Grafting is usually performed during late winter or early spring.
How long does it take for propagated roses to establish roots?
The time required for roots to form varies depending on the method and environmental conditions. Generally, it takes 6-8 weeks for stem cuttings to develop roots, while layering can take several months.
Can I propagate roses in water?
While it is possible to root rose cuttings in water, it is generally recommended to use a well-draining potting mix for better success and root development.
Is it necessary to use the rooting hormone during rose propagation?
No use of rooting hormone is not mandatory. However, Using it can significantly improve the success rate of rooting stem cuttings. It encourages the development of roots and increases the chances of successful propagation.
Can I propagate roses from supermarket-bought flowers?
It is unlikely to successfully propagate roses from supermarket-bought flowers as they are often hybrid varieties with low chances of rooting.
What can I do if my propagated roses are not growing?
If propagated roses are not growing, ensure they have adequate sunlight, water, and nutrients. Consider adjusting their growing conditions and providing proper care, including fertilization, to encourage growth.
[su_note note_color=”#ecece2″ radius=”1″]How to grow bare root roses[/su_note]
Conclusion:
Congratulations, you’ve now discovered the secrets of rose propagation and have taken the first step toward creating your own flourishing rose garden. Now, armed with newfound knowledge, it’s time to take action. Grab your gardening tools, select your favorite rose varieties, and start propagating with confidence.
We hope this article has provided you with valuable insights, tips, and guidance to embark on this beautiful journey. If you found this information helpful, don’t keep it to yourself—share it with fellow gardening enthusiasts and spread the joy of rose propagation far and wide.
And remember, this is just the beginning! Explore more articles on our site to enhance your gardening knowledge and dive deeper into the captivating world of roses.
Amazon and the Amazon logo are trademarks of Amazon.com, Inc, or its affiliates.

Gardener with 12+ years of hands-on experience growing vegetables and fruits in home gardens. Learned through trial, error, and observation — not textbooks. Shares what actually works (and what doesn’t) in real-world conditions. No fluff, no hype — just practical tips from the soil up.