We use affiliate links to run our site. When you buy through links on our site, we may earn an affiliate commission, without any added cost to you. Learn more
Have you ever walked past a garden bursting with tulips in spring and thought, “I want that”? You are
definitely not alone. Tulips are one of the most beloved flowering plants on the planet. The good news is that
they are not as hard to grow as you might think. you can grow stunning tulips with a little bit of know-how.
In this comprehensive guide, we are going to walk you through everything. We will cover how to choose the right bulbs, how to engineer your soil, and how to care for your plants after they bloom.
Think of this guide as your trusted gardening best friend. We are here to give you the real talk you need to get those gorgeous flowers growing beautifully.
Why Tulips Are Worth the Effort
Let us be perfectly honest here. Gardening takes real work. It requires time, patience, and dirty fingernails. So
why should you bother with tulip bulbs?

Here is the big secret: tulips are like nature’s very own fireworks. They burst onto the scene in early spring with incredibly vibrant colors. They can completely transform a dull, gray winter garden into a living masterpiece.
Whether you love fiery reds, sunny yellows, deep purples, soft pinks, pure whites, or wild stripes, there is a tulip variety for every single personality.
They are also surprisingly low-maintenance once you get them safely into the ground. You plant them in the cozy autumn, forget all about them through the freezing winter, and watch the pure magic happen when spring arrives. That is a pretty fantastic deal, isn’t it?
Understanding Tulip Bulbs:
Anatomy of a Tulip Bulb:
Before you grab your trowel and start digging holes, let us look at the bulb itself.
A tulip bulb is more like a battery, self-contained, pre-programmed botanical miracle. It is tightly packed with carbon reserves, nutrients, and a complete embryonic flower map. It is simply waiting for the right thermal and hydrological signals to discharge its spectacular spring performance.
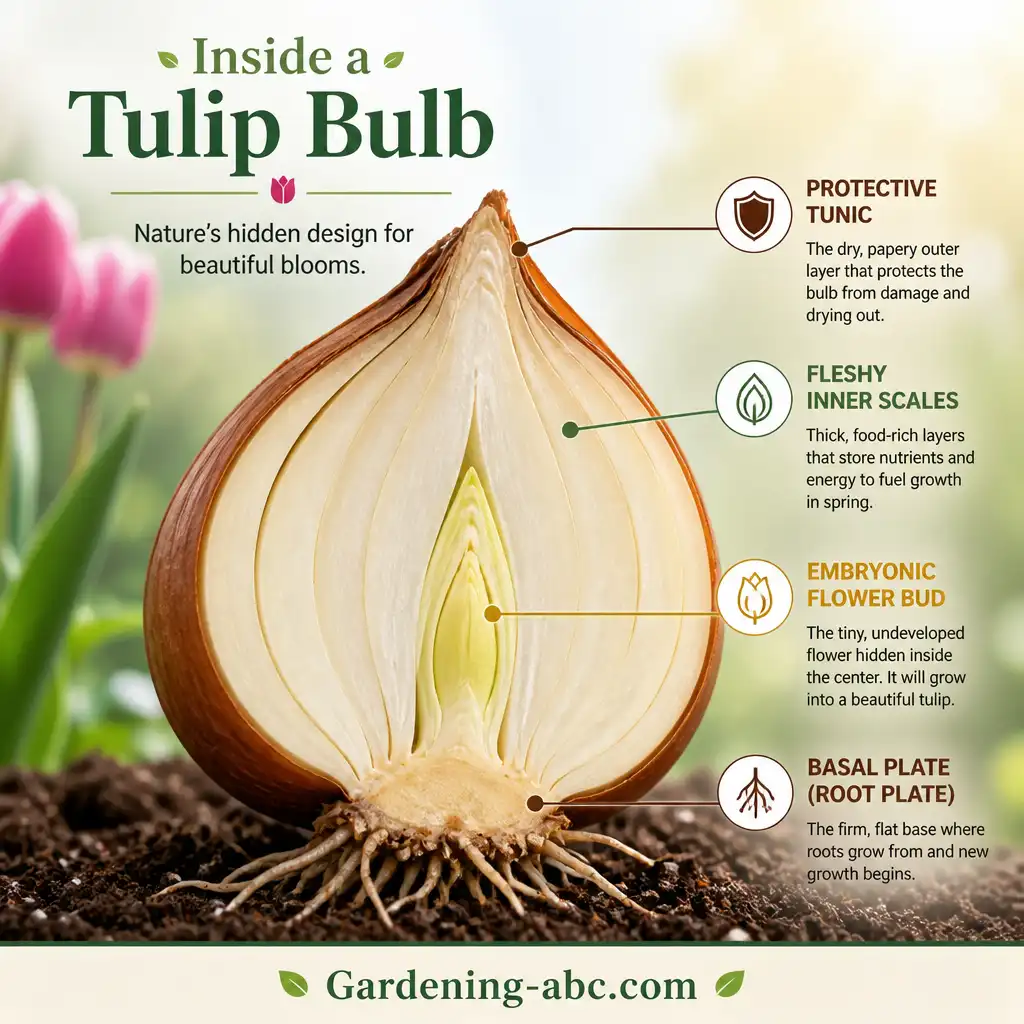
A healthy tulip bulb consists of three main structures.
- First is the basal plate. This is the flattened disc at the very bottom of the bulb. All the roots grow from this exact spot. Damage to this plate is completely irreparable, and a damaged plate means the bulb cannot grow roots.
- Second is the tunic. This is the papery brown outer layer that looks like an onion skin. It protects the fleshy inner scales from drying out or getting scratched. Some peeling is totally normal. A missing tunic does not mean the bulb is dead, as long as the white body underneath stays firm.
- Third is the embryonic flower bud. It sits nestled deep inside the scales, waiting for winter cold to finish its growth.
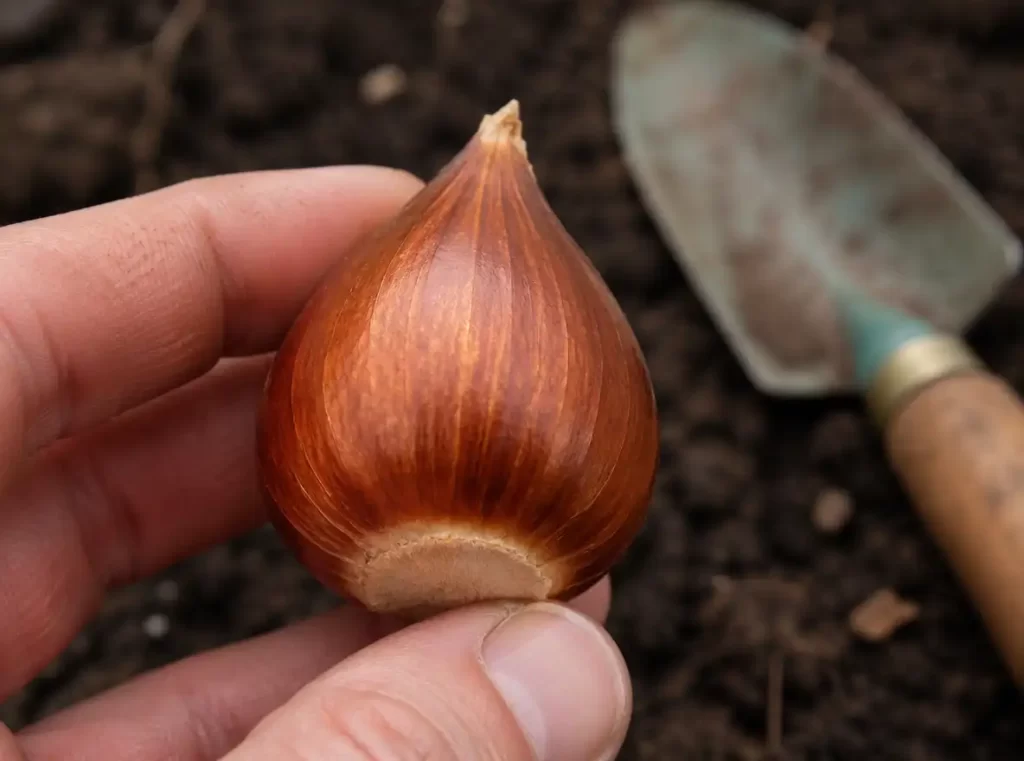
Audit Bulbs Before Planting:
You should always inspect every single bulb before it touches the soil. It is vital to separate harmless surface issues from terminal diseases.
Have you spotted a bit of powdery blue-green mold on the papery tunic? Do not panic. This is a common surface mold called Penicillium. It frequently shows up during storage and is completely harmless to the plant.
However, you must watch out for dangerous signs.
- Toss out any bulbs that feel light, hollow, or like a dried-up “mummy.”
- Avoid bulbs that feel soft or give off a sour, rotting smell.
- Look closely for tiny black resting structures, known as sclerotia, on the outer scales. These symptoms indicate a nasty fungal infection called Botrytis tulipae, or “tulip fire.” Planting an infected bulb introduces this disease into your clean garden soil, which can ruin your entire display.
Choosing the Right Bulb Size for Your Garden
When it comes to buying tulip bulbs, size directly dictates flower performance. If you are planning a grand
display for a prominent landscape focal point, always prioritize large, premium-grade bulbs.
Look for bulbs that measure 12 centimeters or more in circumference. These large batteries hold the most energy. They will reward you with the tallest, strongest stems and the largest, most dramatic blooms.
What about the smaller 10 to 11 centimeter bulbs? Do not ignore them. They are excellent for creating dense, meadow-style naturalized areas. In a large meadow, individual flower size matters much less than the massive, sweeping impact of collective color.
When to Plant Tulip Bulbs:
Why Tulips Need Winter Cold to Trigger Blooms
Here is a question that trips up a lot of new gardeners: when do you actually put tulip bulbs into the ground?
The short answer is autumn.
But why do we plant them in the fall instead of the spring? The secret lies in a biological process called vernalization.
Tulip bulbs possess an internal chilling clock. They absolutely require a prolonged exposure to cold temperatures to trigger their growth cycle. This cold period allows the bulb to convert its stored starches into sweet sugars. These sugars are the exact fuel needed for stem elongation and flower development.
Typically, tulips need 12 to 16 weeks of consistent cold. The temperature must stay between 35°F and 45°F (2°C to 7°C).
What happens if you try to plant them in the spring? You will likely experience complete disappointment. The bulbs will not have had enough cold exposure to tick their internal clock. This causes a failure known as “blasting,” where the bulb produces only leaves or short, stunted, aborted flowers.
Checking Soil Temperatures Before You Dig
Professional gardeners do not plant their bulbs by looking at a calendar page. Instead, they plant by reading a soil thermometer. This is the golden rule of timing.
The optimal soil temperature for planting tulips is consistently below 55°F (13°C) at a depth of six inches. You want the daytime soil to be cool and nighttime air temperatures to drop consistently into the 40s.
Ideally, you should aim to plant your bulbs about 5 to 6 weeks before your local ground freezes solid. This window gives the bulb enough time to establish a strong root system without triggering top growth.
Why must we avoid warm soil? Soil that is too warm serves as a breeding ground for nasty fungal rots. It can also trick the bulb into sending up premature green shoots. These tender shoots will quickly get zapped and damaged by the harsh winter frost.
Planting Tips for Southern and Warm Climates
Where you live determines your specific planting strategy. If you garden in USDA Zones 4 through 7, you are
in luck. Your natural winter weather provides the perfect chill. You can plant anytime from September through
November once your soil drops below 55°F.
But what if you live in the warm south, like Zones 8 through 10, where winters barely dip below 50°F? Do not worry, you can still enjoy beautiful tulips! You just have to trick the bulbs by artificially chilling them.
Place your tulip bulbs inside a paper bag and store them in your refrigerator for 12 to 16 weeks before planting.
Here is a critical warning: keep your bulbs far away from ripening fruits like apples, pears, or bananas. These fruits release ethylene gas as they ripen. This invisible gas acts as a poison to the embryonic flower bud inside the bulb, destroying its ability to bloom.
Planting Depth, Bulb Spacing, and Soil Conditions
Avoid Excess Water to Prevent Rotten Bulbs
If there is one thing that tulips absolutely hate, it is having “wet feet.” Standing winter water is the absolute
fastest route to total bulb failure.
When garden soil remains saturated with water, oxygen is completely pushed out of the tiny spaces between soil particles. Without oxygen, the root initials suffocate, cell walls collapse, and anaerobic bacteria take over. The result is a mushy, rotten bulb that will never grow.
Excellent drainage is completely non-negotiable. If your garden features heavy clay soil that holds water like a sponge, you must take action. Loosen the soil and amend the entire planting zone by mixing in plenty of coarse sand, fine grit, or rich organic compost to break up the clay.
If your soil drainage is truly terrible, save yourself the heartbreak and plant your tulips in raised garden beds or deep outdoor containers instead.
Deep Planting vs Shallow Mulched Methods
For generations, the standard rule of thumb for planting bulbs has been simple: plant the bulb at a depth
equal to three times its height. For a standard two-inch tulip bulb, this traditional method means digging down 6 to 8 inches deep.
Planting at this depth keeps the bulbs well-insulated from sudden winter temperature swings. It anchors the tall stems against strong spring winds, and it keeps them safely away from hungry surface pests like squirrels.
However, recent scientific research has turned this traditional wisdom on its head. Cornell University conducted a groundbreaking 10-year study on bulb planting depths. They discovered that bulbs planted just 2 to 3 inches deep—but covered with a thick 2 to 4-inch layer of organic mulch—actually outperformed deep-planted bulbs.
These shallow-planted bulbs delivered superior blooms and showed significantly higher return rates over a full decade.
The science behind this revision is fascinating. Deep soil stays wet and cold for much longer periods. This exposes the dormant bulbs to excessive moisture during their summer rest, which promotes rot. The thick mulch layer protects the bulbs from winter cold just as effectively as deep soil, while keeping them drier during the summer.
So, which method should you choose? Traditional deep planting (6 to 8 inches) remains an excellent choice if you have sandy, fast-draining soil or face intense squirrel pressure. For average garden soils, the Cornell method of shallow planting combined with heavy mulch is highly recommended.
How Planting Depth Influences Bloom Timing:
You can use subterranean physics to your advantage! Planting depth directly affects the temperature of the soil surrounding the bulb.
Deeper soil warms up much slower in the spring. Because of this, deeper planting delays the exact time a tulip flowers.
You can leverage this principle strategically in your garden. Try planting the exact same tulip variety at varying depths (some at 4 inches, some at 6 inches, and some at 8 inches) within the very same flower bed.
This clever trick will naturally stagger the bloom times, allowing you to enjoy a single variety for weeks instead of just a few days!
Correct Bulb Orientation for Maximum Energy Savings
When you place the bulb into its planting hole, always make sure the pointed tip faces directly upward. The
flattened basal plate must sit firmly against the bottom of the hole.
This correct orientation ensures that the emerging green stem takes the shortest, straightest path to the sunlight. This saves the bulb’s finite, precious energy reserves.
What happens if a bulb gets planted upside down? An inverted bulb will still try its best to grow. However, it will be forced to expend its critical carbohydrate reserves navigating a clumsy, U-shaped path underground just to reach daylight.
This wasted energy often results in a weaker, shorter stem and a smaller, less vibrant flower.
High-Impact Garden Design Strategies
Avoid Rigid Single-File Rows
Let us look at a very common visual mistake made in bulb gardening: planting tulips in a straight, single-file
line along a walkway. Garden designers often refer to this look as “tin soldiers.” The final result usually looks
thin, rigid, and scattered. It completely fails to create a strong visual impact in your landscape.
Tulips look their absolute best when they are grouped closely together. To create a show-stopping display, you want to think in terms of blocks, masses, drifts, and pockets of continuous color.
How to Group Bulbs for a Natural Cluster Effect
Think of your tulip grouping as a single, striking architectural installation rather than a collection of individual
plants. Instead of digging tiny, isolated holes for each individual bulb, excavate one large planting pocket.
Group your bulbs tightly within this pocket, spacing them about 4 to 6 inches apart.
If you want a incredibly lush, dense block of color, stick to the 4-inch spacing. If you prefer a more natural, scattered look, spread them out to 6 inches. Always plant your bulbs in odd-numbered groupings, such as 7, 15, 25, or 50 bulbs.
Why odd numbers? It is a classic design secret. Odd-numbered clusters look much more organic, balanced,
and fluid to the human eye than stiff, even-numbered rows. Gardeners have successfully used this artistic
trick for centuries to create breathtaking landscapes.
Layering Bulbs in Pots
If you are limited to container gardening on a patio or balcony, you can use a brilliant method called the “bulb lasagna” technique. This engineering trick delivers a continuous, spectacular column of blooms that lasts for 6 to 8 weeks.
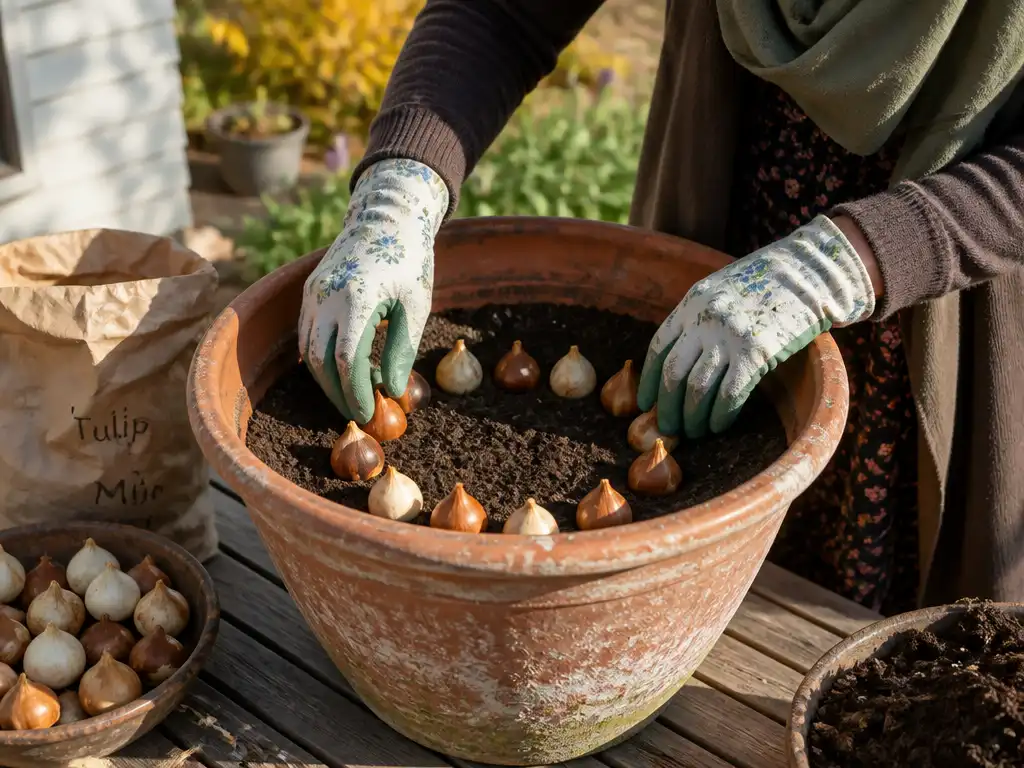
To build one, you need a large, deep pot—at least 12 inches deep—with excellent drainage holes at the bottom. You will plant your bulbs in distinct, layered zones, covering each layer with fresh potting soil as you go up:
- The Bottom Layer (Deepest): Plant your late-blooming, tall varieties, such as Darwin Hybrids, at a depth of about 12 inches (30 cm). These require the longest time to grow and will emerge last.
- The Middle Layer: Plant your mid-season varieties, like Triumph or Single Early tulips, at a depth of about 8 inches (20 cm) directly above the bottom layer.
- The Top Layer (Shallowest): Plant your early dwarf or tiny species tulips at a shallow depth of 4 inches (10 cm) near the surface.
What is the magic result of this setup? As the top layer finishes its beautiful bloom, the middle layer pushes
past the old foliage to take center stage. Once they fade, the giant late-blooming varieties from the bottom
layer rise up to finish the show.
This creates a non-stop, changing floral progression from the chilly days of early spring all the way through late May.
Tulip Varieties and Early to Late Bloom Schedules
To help you plan your garden drifts or container lasagna perfectly, let us look at the official classification
system. Internationally, tulips are grouped into 15 distinct divisions based on their flower shape, genetic origin, and blooming schedule. Table 2 breaks down the most popular choices for home gardens.
Quick-Reference Tulip Group & Planting Guide
| Tulip Division | Bloom Window | Average Height | Best Architectural Use | Wind Resilience |
| Single Early | Late March to Early April | 10–18 inches (25–45 cm) | Front borders, patio containers, early spring color accent | Moderate |
| Triumph | Mid-April | Up to 24 inches (60 cm) | Mass garden plantings, professional cut flowers | High |
| Darwin Hybrid | Mid-Spring (April) | 20–28 inches (50–70 cm) | Large landscape backdrops, reliable perennializing | Very High |
| Parrot | Late April to May | 14–22 inches (35–55 cm) | Garden focal points, dramatic specimen planting | Low (Petals easily damaged) |
| Species (Botanical) | March to May (Varies) | 4–12 inches (10–30 cm) | Rock gardens, pathways, permanent naturalizing | High |
How to Protect Your Unprotected Bulbs from Pests
Use Wire Mesh to Stop Digging Animals
Unlike daffodils or allium bulbs, which contain bitter, toxic compounds that animals actively avoid, tulip bulbs are sweet, crisp, and starchy. To an underground vole or a foraging backyard squirrel, an unprotected tulip bulb is a delicious, high-energy winter snack.
While smelly chemical repellents can help, they quickly wash away in the rain. The only surefire, guaranteed solution to protect your bulbs is physical exclusion using the Hardware Cloth Protocol.
- Purchase 1/2-inch galvanized hardware cloth (do not use cheap chicken wire, as voles can squeeze right through it and it rusts away within a single season).
- Dig out your planting trench to a depth of 6 to 8 inches.
- Shape your hardware cloth into a wide, shallow tray with low walls and place it flat into the bottom of the trench.
- Add two inches of loose soil into the tray, arrange your tulip bulbs inside, and fill the trench back up with soil.
- For ultimate protection against digging squirrels, lay another flat sheet of hardware cloth directly over the top of the soil before adding your mulch.
- When spring arrives and you see the first green tips pushing up, simply remove the top wire sheet so the stems can grow freely into the sunshine.
Use Natural Companion Flowers to Repel Rodents
Another brilliant way to defend your tulip bulbs is to use nature’s own defense systems. You can hide your tulips by using a strategy called olfactory camouflage—companion planting your tulips alongside unpalatable, smelly geophytes that critters absolutely despise. Daffodils (Narcissus), ornamental alliums, and beautiful fritillarias naturally repel pests with their strong scents and bitter tastes.
By interplanting these protective species throughout your tulip beds, you create a confusing smell barrier that deters predation.
Caring for Tulips After They Bloom
The beautiful spring flowers have finally faded and dropped their petals. Now what should you do? Here is a golden rule: whatever you do, do not cut down those green leaves! Even though the spent foliage can look a bit messy, those leaves are still working incredibly hard as biological solar panels.
They are capturing sunlight, performing photosynthesis, and sending vital energy back down into the underground bulb to recharge it for next year’s bloom cycle.
Cutting the leaves early starves the bulb, ensuring it will never bloom again. Let the foliage die back completely and naturally, which usually takes about six weeks after the flowers finish.
If you hate the sight of yellowing, dying leaves in your flower beds, you can easily hide them by planting lush annual flowers or bushy perennials right around the tulips to camouflage the fading foliage while it finishes its critical job.
Replanting and Storing Tulip Bulbs Correctly
Can you dig up and replant tulip bulbs? Absolutely! Once the foliage has completely turned brown and died back, you can safely dig up the dormant bulbs.
Gently clean off the excess soil, trim away the dead roots, and store them in a cool, dark, dry, and well-ventilated place over the hot summer months. When autumn rolls around again, simply replant them into fresh soil, and they should bloom beautifully once more.
Some specific varieties, especially the tough Darwin Hybrids, are excellent at “perennializing,” meaning they will reliably come back and bloom year after year in the same spot.
However, you should know that many modern hybrid tulips put on their absolute best, most show-stopping performance in their very first spring.
Because of this, many passionate gardeners choose to treat tulips as annual plants—they simply pull up the entire plant after blooming and purchase fresh, premium bulbs every single autumn. Sometimes, starting completely fresh just gives you the most spectacular results!
Conclusion:
So, there you have it! You now possess a complete, science-based guide to planting and growing tulips successfully. From selecting premium, heavy-grade bulbs and calculating your local soil temperatures, to engineering perfect drainage and building rodent-proof wire cages, you have the exact blueprint for success.
Yes, tulips do ask for a little bit of careful planning, precision, and winter patience, but when those first bright, incredibly colorful blooms push through the cold spring soil, you will know that every single bit of effort was entirely worth it.
Just remember the four golden rules of tulip architecture: plant in the cool fall, go deep enough to protect the bulb, ensure excellent soil drainage, and always let the leaves die back naturally.
Now, it is time to grab your garden trowel, pick out your favorite colors, and get those beautiful biological batteries into the ground. Your dream spring garden is waiting!
Don’t forget to PIN IT
Frequently Asked Questions (FAQs)
Can I successfully plant tulips in pots, containers, or window boxes?
Yes, absolutely! Tulips do wonderfully well in containers. The key is to use a pot that is at least 12 inches deep and features excellent drainage holes. Plant your bulbs 6 inches deep in high-quality, fast-draining potting soil.
Over the winter, place the container in an unheated garage, porch, or garden shed. This protects the pot from freezing solid while still giving the bulbs the 12 to 16 weeks of cold chilling they require. Bring the pot out into full sun in early spring, and enjoy a gorgeous mobile display on your patio or balcony.
How many tulip bulbs should I plant together in a group for the best visual impact?
For a truly natural, eye-catching, and professional-looking display, you should plant tulips in tight clusters or drifts of at least 7 to 15 bulbs. Always try to use odd numbers (like 7, 9, 15, or 25). Odd numbers look much more organic and less rigid to the human eye.
Avoid scattering single bulbs randomly around your garden beds. Solitary tulips look lonely and get lost in the landscape. Grouping them closely together creates a powerful, solid block of unforgettable color.
Why did my tulips fail to bloom this spring, producing only green leaves?
There are usually four main culprits behind non-blooming tulips. The most common cause is insufficient winter chilling. If the bulbs do not get 12 to 16 weeks of cold temperatures, they will fail to form flowers.
Other common mistakes include poor soil drainage which causes the bulb to rot, planting the bulbs too shallowly, or cutting down the green leaves too early in the previous spring.
Additionally, if your tulips have been in the exact same spot for many years, they can become overcrowded and go “blind,” producing only leaves. Dig them up, divide them, and replant them in fresh, nutrient-rich soil.
Do all tulip varieties come back reliably every single year?
While some specific varieties—especially Darwin Hybrids and wild Species tulips—are excellent at perennializing and coming back for a few years, most modern, highly-bred tulips perform best only in their very first spring.
In warm climates, the soil simply does not get cold enough in winter to allow them to rebloom naturally. To guarantee a flawless, intensely colorful display every single spring, many professional landscapers and home gardeners treat tulips as annuals, planting fresh, premium-grade bulbs every autumn.
What is the absolute best way to stop squirrels from digging up my tulip bulbs?
The absolute best, most effective method to stop squirrels is physical exclusion using the Hardware Cloth Protocol. Lay a flat sheet of 1/2-inch galvanized hardware cloth over the top of your planted bulbs before covering the area with mulch. Squirrels cannot dig through the strong metal mesh.
When the green shoots begin to emerge through the soil in early spring, simply remove the wire sheet so the flowers can grow upright without any restriction.
Amazon and the Amazon logo are trademarks of Amazon.com, Inc, or its affiliates.

Gardener with 12+ years of hands-on experience growing vegetables and fruits in home gardens. Learned through trial, error, and observation — not textbooks. Shares what actually works (and what doesn’t) in real-world conditions. No fluff, no hype — just practical tips from the soil up.